MCP Registry
Skyvern
By Skyvern-AI·23,336
AI-powered browser automation — navigate, click, fill forms, and extract data from any website.
Install MCP server
🐉 Automate Browser-based workflows using LLMs and Computer Vision 🐉







Skyvern automates browser-based workflows using LLMs and computer vision. It provides a Playwright-compatible SDK that adds AI functionality on top of playwright, as well as a no-code workflow builder to help both technical and non-technical users automate manual workflows on any website, replacing brittle or unreliable automation solutions.
Traditional approaches to browser automations required writing custom scripts for websites, often relying on DOM parsing and XPath-based interactions which would break whenever the website layouts changed.
Instead of only relying on code-defined XPath interactions, Skyvern relies on Vision LLMs to learn and interact with the websites.
How it works
Skyvern was inspired by the Task-Driven autonomous agent design popularized by BabyAGI and AutoGPT -- with one major bonus: we give Skyvern the ability to interact with websites using browser automation libraries like Playwright.
Skyvern uses a swarm of agents to comprehend a website, and plan and execute its actions:
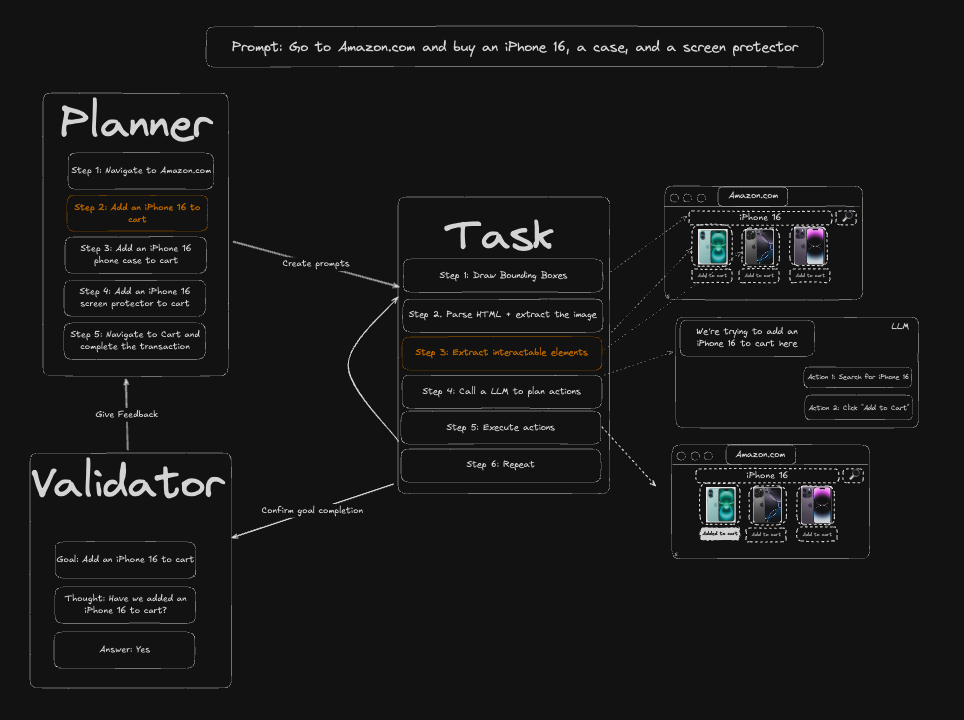
This approach has a few advantages:
- Skyvern can operate on websites it's never seen before, as it's able to map visual elements to actions necessary to complete a workflow, without any customized code
- Skyvern is resistant to website layout changes, as there are no pre-determined XPaths or other selectors our system is looking for while trying to navigate
- Skyvern is able to take a single workflow and apply it to a large number of websites, as it's able to reason through the interactions necessary to complete the workflow
A detailed technical report can be found here.
Demo
https://github.com/user-attachments/assets/5cab4668-e8e2-4982-8551-aab05ff73a7f
Quickstart
Skyvern Cloud
Skyvern Cloud is a managed cloud version of Skyvern that allows you to run Skyvern without worrying about the infrastructure. It allows you to run multiple Skyvern instances in parallel and comes bundled with anti-bot detection mechanisms, proxy network, and CAPTCHA solvers.
If you'd like to try it out, navigate to app.skyvern.com and create an account.
Run Locally (UI + Server)
Choose your preferred setup method:
Database default: skyvern quickstart and skyvern run server default to a SQLite database at ~/.skyvern/data.db so the pip path works without Postgres or Docker. To use Postgres instead, pass --database-string for an existing database (or omit --no-postgres so quickstart starts its own Postgres container). Docker Compose always uses the bundled Postgres service.
Option A: pip install (Recommended for Python-managed local setup)
Dependencies needed:
Additionally, for Windows:
- Rust
- VS Code with C++ dev tools and Windows SDK
1. Install Skyvern
pip install "skyvern[all]"
2. Run Skyvern
skyvern quickstart
The pip quickstart uses SQLite by default. To use a local Postgres container instead, run skyvern quickstart (Postgres container is started unless you pass --no-postgres), or connect to an existing database with --database-string=postgresql+psycopg://user:pass@host:5432/dbname.
Option B: Docker Compose
Use this option if you want everything containerized (Postgres, API, UI) and don't want to install Python/Node locally.
- Install Docker Desktop
- Clone the repository:
git clone https://github.com/skyvern-ai/skyvern.git && cd skyvern
- Configure your LLM provider in .env (the quickstart --docker-compose command below will create it from .env.example if missing):
cp .env.example .env # if not already created
edit .env to add your LLM API key
- Start everything:
docker compose up -d
Troubleshooting
(sqlite3.OperationalError) table organizations already exists — You hit a known bug in pip install skyvern==1.0.31. Fix:
rm ~/.skyvern/data.db # remove the leftover SQLite file pip install --upgrade skyvern # 1.0.32+ contains the fix skyvern quickstart
If you are still on 1.0.31 and cannot upgrade, install via uv instead:
uv pip install skyvern
pip install skyvern fails with ResolutionImpossible (litellm / fastmcp) — You hit a dependency-resolution conflict in 1.0.31. Either upgrade to 1.0.32+ or use uv: uv pip install skyvern.
SDK
Skyvern is a Playwright extension that adds AI-powered browser automation. It gives you the full power of Playwright with additional AI capabilities—use natural language prompts to interact with elements, extract data, and automate complex multi-step workflows.
Installation:
- Python SDK / cloud API: pip install skyvern
- Local server + packaged UI: pip install "skyvern[all]" then run skyvern quickstart
- Local server + packaged UI with Postgres: pip install "skyvern[all]" then run skyvern quickstart --database-string=postgresql+psycopg://user:pass@host:5432/dbname
- Packaged UI for an existing API: pip install "skyvern[ui]" then set VITE_API_BASE_URL (and VITE_SKYVERN_API_KEY if your API requires a key) and run skyvern run ui
- TypeScript: npm install @skyvern/client
AI-Powered Page Commands
Skyvern adds four core AI commands directly on the page object:
- Description
- page.act(prompt): Perform actions using natural language (e.g., "Click the login button")
- page.extract(prompt, schema): Extract structured data from the page with optional JSON schema
- page.validate(prompt): Validate page state, returns bool (e.g., "Check if user is logged in")
- page.prompt(prompt, schema): Send arbitrary prompts to the LLM with optional response schema
Additionally, page.agent provides higher-level workflow commands:
- Description
- page.agent.run_task(prompt): Execute complex multi-step tasks
- page.agent.login(credential_type, credential_id): Authenticate with stored credentials (Skyvern, Bitwarden, 1Password)
- page.agent.download_files(prompt): Navigate and download files
- page.agent.run_workflow(workflow_id): Execute pre-built workflows
AI-Augmented Playwright Actions
All standard Playwright actions support an optional prompt parameter for AI-powered element location:
- Playwright
- Click: page.click("#btn")
- Fill: page.fill("#email", "a@b.com")
- Select: page.select_option("#country", "US")
- Upload: page.upload_file("#file", "doc.pdf")
- Click: page.click(prompt="Click login button")
- Fill: page.fill(prompt="Email field", value="a@b.com")
- Select: page.select_option(prompt="Country dropdown", value="US")
- Upload: page.upload_file(prompt="Upload area", files="doc.pdf")
Three interaction modes:
# 1. Traditional Playwright - CSS/XPath selectors await page.click("#submit-button")
# 2. AI-powered - natural language await page.click(prompt="Click the green Submit button")
# 3. AI fallback - tries selector first, falls back to AI if it fails await page.click("#submit-btn", prompt="Click the Submit button")
Core AI Commands - Examples
# act - Perform actions using natural language await page.act("Click the login button and wait for the dashboard to load")
# extract - Extract structured data with optional JSON schema result = await page.extract("Get the product name and price") result = await page.extract( prompt="Extract order details", schema={"order_id": "string", "total": "number", "items": "array"} )
# validate - Check page state (returns bool) is_logged_in = await page.validate("Check if the user is logged in")
# prompt - Send arbitrary prompts to the LLM summary = await page.prompt("Summarize what's on this page")
Quick Start Examples
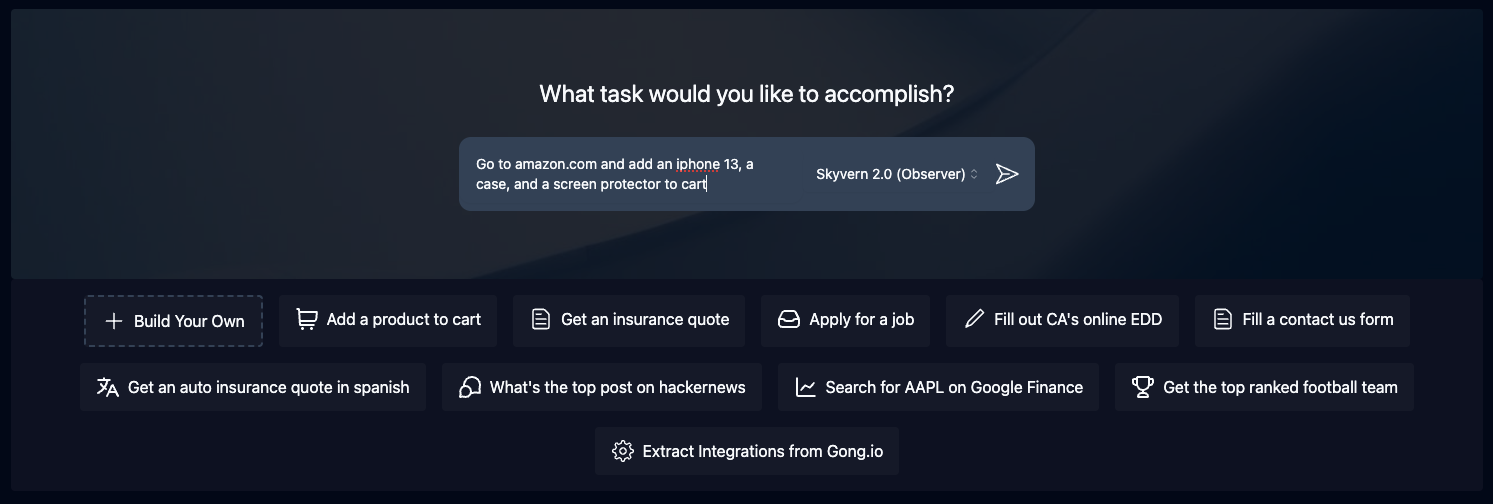
Run via UI:
skyvern run all
Navigate to http://localhost:8080 to run tasks through the web interface. If the packaged UI is missing, skyvern run ui will offer to install the matching UI package.
To run only the packaged UI against an existing Skyvern API, install skyvern[ui] and set the
environment variables below before running skyvern run ui:- VITE_API_BASE_URL (e.g. http://localhost:8000/api/v1) — points the UI at your Skyvern API
- VITE_SKYVERN_API_KEY — the API key if your API requires one
- VITE_WSS_BASE_URL — WebSocket endpoint (inferred from VITE_API_BASE_URL if unset)
- VITE_ARTIFACT_API_BASE_URL — base URL for artifact downloads
- VITE_BROWSER_STREAMING_MODE — browser viewport streaming mode
Python SDK:
from skyvern import Skyvern
# Local mode skyvern = Skyvern.local()
# Or connect to Skyvern Cloud skyvern = Skyvern(api_key="your-api-key")
# Launch browser and get page browser = await skyvern.launch_cloud_browser() page = await browser.get_working_page()
# Mix Playwright with AI-powered actions await page.goto("https://example.com") await page.click("#login-button") # Traditional Playwright await page.agent.login(credential_type="skyvern", credential_id="cred_123") # AI login await page.click(prompt="Add first item to cart") # AI-augmented click await page.agent.run_task("Complete checkout with: John Snow, 12345") # AI task
TypeScript SDK:
import { Skyvern } from "@skyvern/client";
const skyvern = new Skyvern({ apiKey: "your-api-key" }); const browser = await skyvern.launchCloudBrowser(); const page = await browser.getWorkingPage();
// Mix Playwright with AI-powered actions await page.goto("https://example.com"); await page.click("#login-button"); // Traditional Playwright await page.agent.login("skyvern", { credentialId: "cred_123" }); // AI login await page.click({ prompt: "Add first item to cart" }); // AI-augmented click await page.agent.runTask("Complete checkout with: John Snow, 12345"); // AI task
await browser.close();
Simple task execution:
from skyvern import Skyvern
skyvern = Skyvern() task = await skyvern.run_task(prompt="Find the top post on hackernews today") print(task)
Advanced Usage
Control your own browser (Chrome)
Let Skyvern control your existing Chrome browser — with all your cookies, logins, and extensions.
Step 1: Enable remote debugging in Chrome
- Open Chrome and navigate to chrome://inspect/#remote-debugging
- Click Enable to start the debugging server
- You should see: Server running at: 127.0.0.1:9222
Tip
The skyvern init browser command can do this automatically — it opens chrome://inspect/#remote-debugging, waits for you to enable it, and saves the config.
Step 2: Connect Skyvern
Option A — Python Code:
from skyvern import Skyvern
skyvern = Skyvern( base_url="http://localhost:8000", api_key="YOUR_API_KEY", browser_address="http://127.0.0.1:9222", ) task = await skyvern.run_task( prompt="Find the top post on hackernews today", )
Option B — Skyvern Service:
Add two variables to your .env file:
BROWSER_TYPE=cdp-connect BROWSER_REMOTE_DEBUGGING_URL=http://127.0.0.1:9222
Restart Skyvern service skyvern run all and run the task through UI or code
Connect Skyvern Cloud to your local browser
Let Skyvern Cloud control a Chrome browser running on your machine — with all your existing cookies, logins, and extensions. Useful for automating sites where you're already logged in or behind a VPN.
One command to start Chrome + create a tunnel to Skyvern Cloud
skyvern browser serve --tunnel
Then use the tunnel URL in your task:
from skyvern import Skyvern
skyvern = Skyvern(api_key="your-api-key") task = await skyvern.run_task( prompt="Download the latest invoice from my account", browser_address="https://abc123.ngrok-free.dev", )
Warning
Always use --api-key when exposing your browser via a tunnel. Without it, anyone with the URL has full control of your browser. See the security docs.
See the full documentation for all options, manual tunnel setup, and troubleshooting.
Get consistent output schema from your run
You can do this by adding the data_extraction_schema parameter:
from skyvern import Skyvern
skyvern = Skyvern() task = await skyvern.run_task( prompt="Find the top post on hackernews today", data_extraction_schema={ "type": "object", "properties": { "title": { "type": "string", "description": "The title of the top post" }, "url": { "type": "string", "description": "The URL of the top post" }, "points": { "type": "integer", "description": "Number of points the post has received" } } } )
Helpful commands to debug issues
Launch the Skyvern Server Separately*
skyvern run server
Launch the Skyvern UI
skyvern run ui
Check status of the Skyvern service
skyvern status
Stop the Skyvern service
skyvern stop all
Stop the Skyvern UI
skyvern stop ui
Stop the Skyvern Server Separately
skyvern stop server
Performance & Evaluation
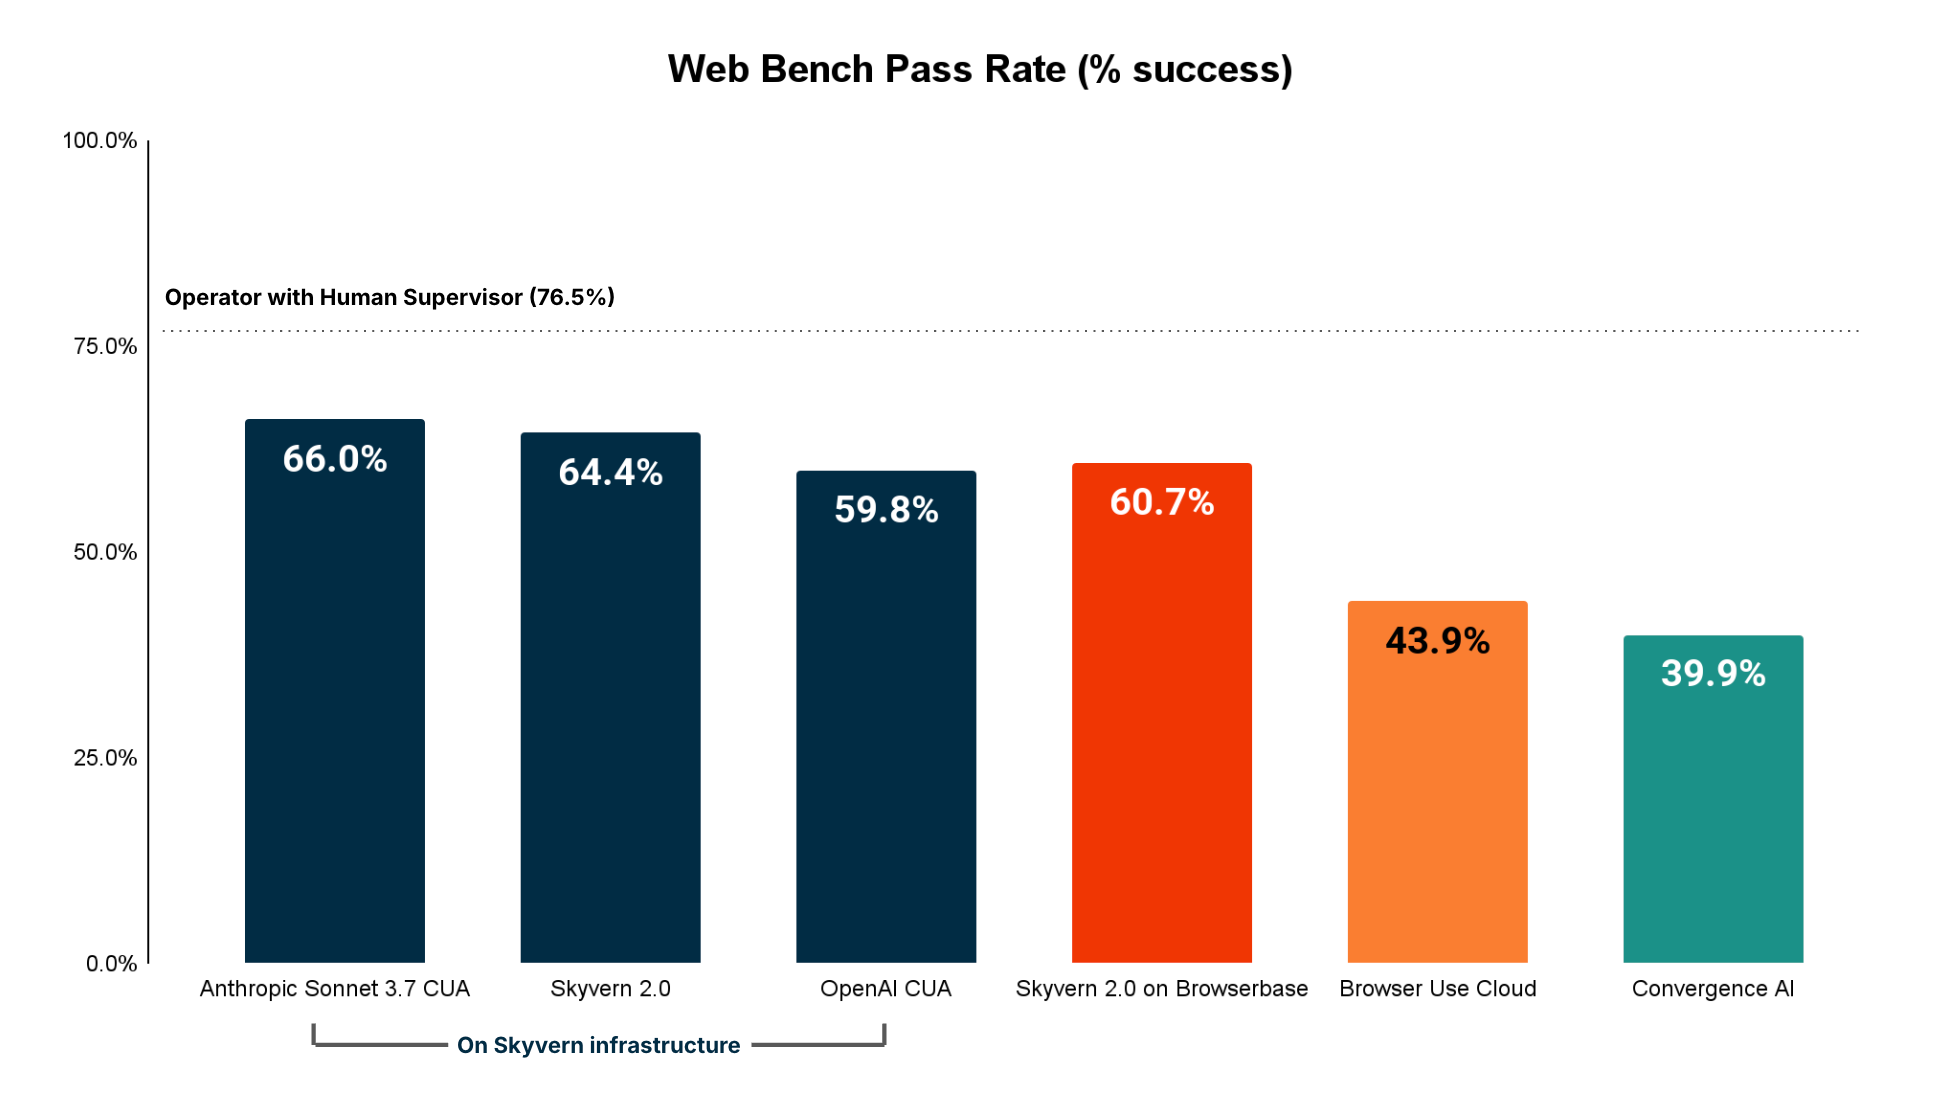
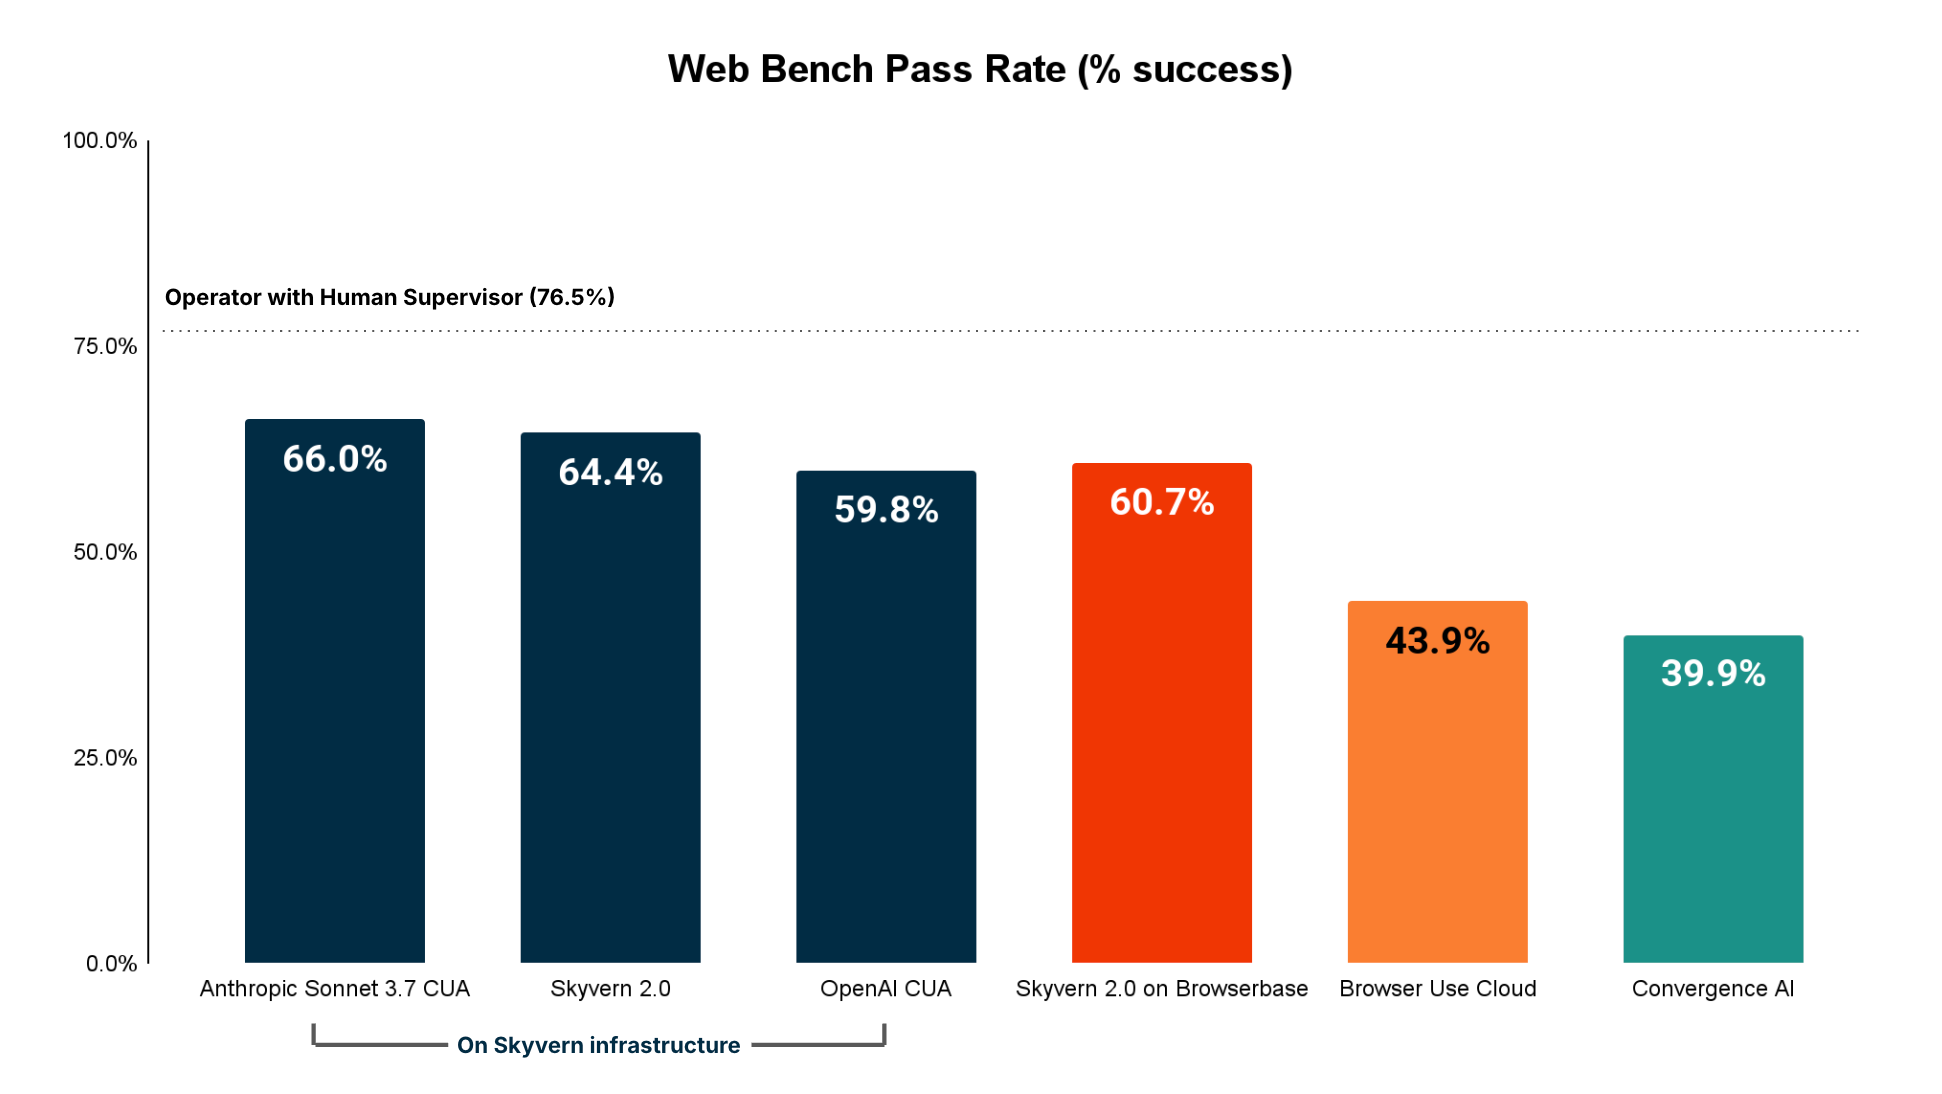
Skyvern has SOTA performance on the WebBench benchmark with a 64.4% accuracy. The technical report + evaluation can be found here
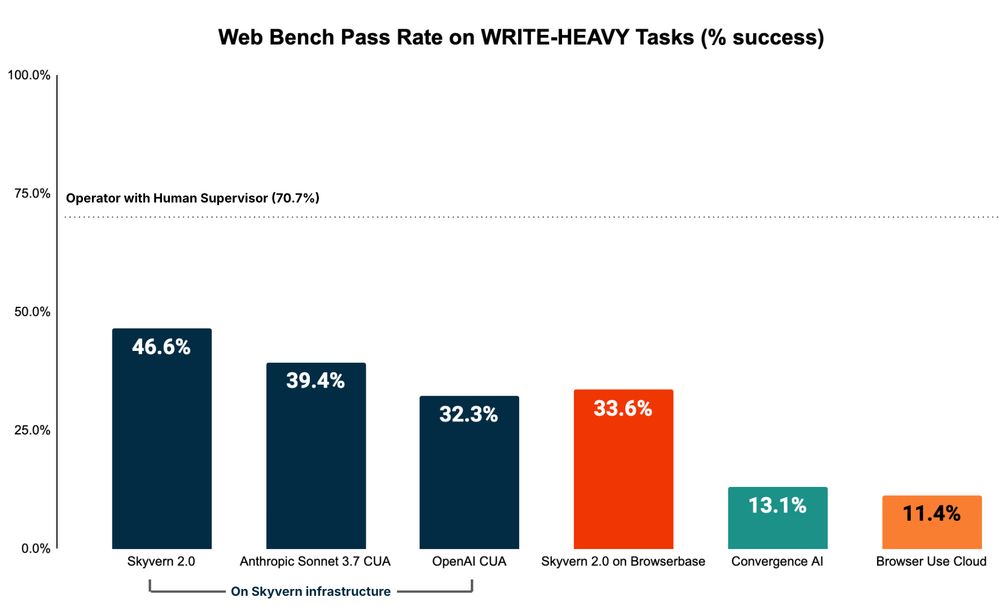
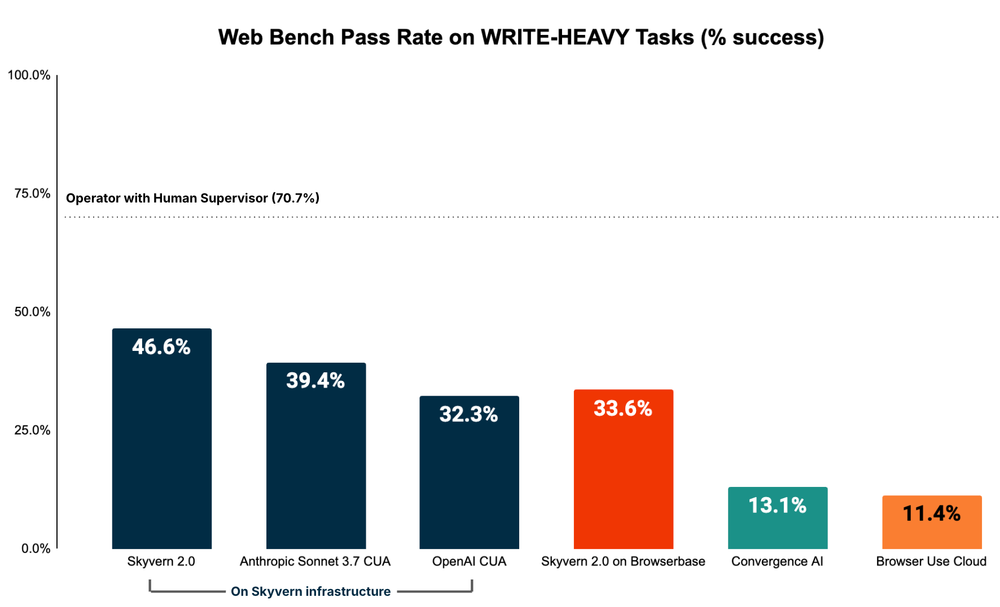
Performance on WRITE tasks (eg filling out forms, logging in, downloading files, etc)
Skyvern is the best performing agent on WRITE tasks (eg filling out forms, logging in, downloading files, etc), which is primarily used for RPA (Robotic Process Automation) adjacent tasks.
Skyvern Features
Skyvern Tasks
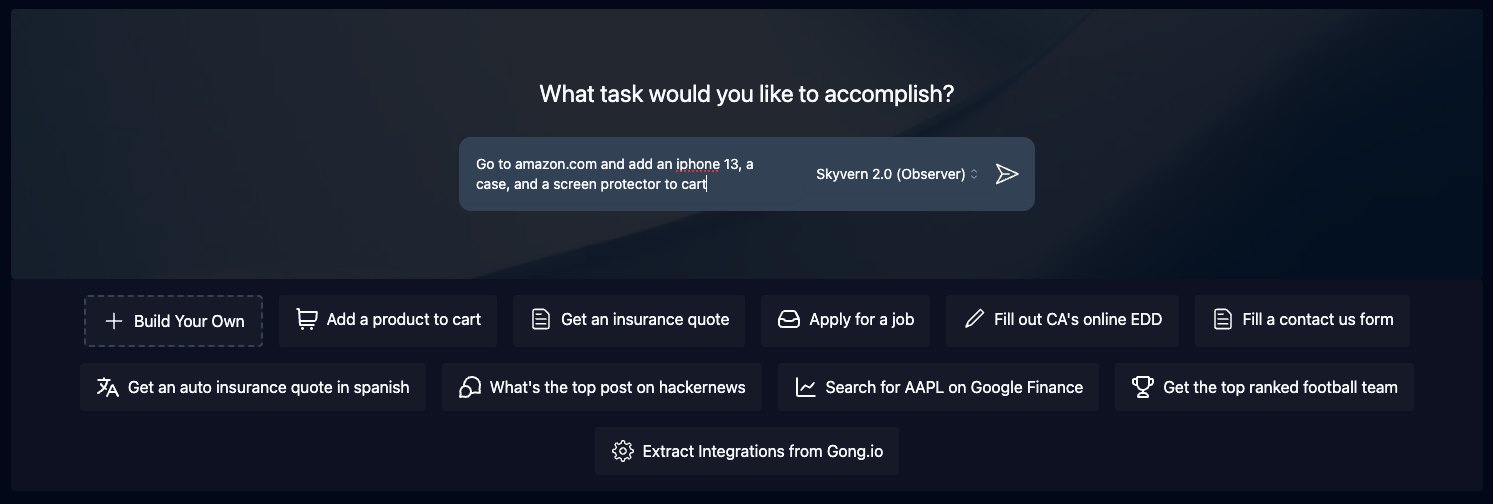
Tasks are the fundamental building block inside Skyvern. Each task is a single request to Skyvern, instructing it to navigate through a website and accomplish a specific goal.
Tasks require you to specify a url, prompt, and can optionally include a data schema (if you want the output to conform to a specific schema) and error codes (if you want Skyvern to stop running in specific situations).
Skyvern Workflows
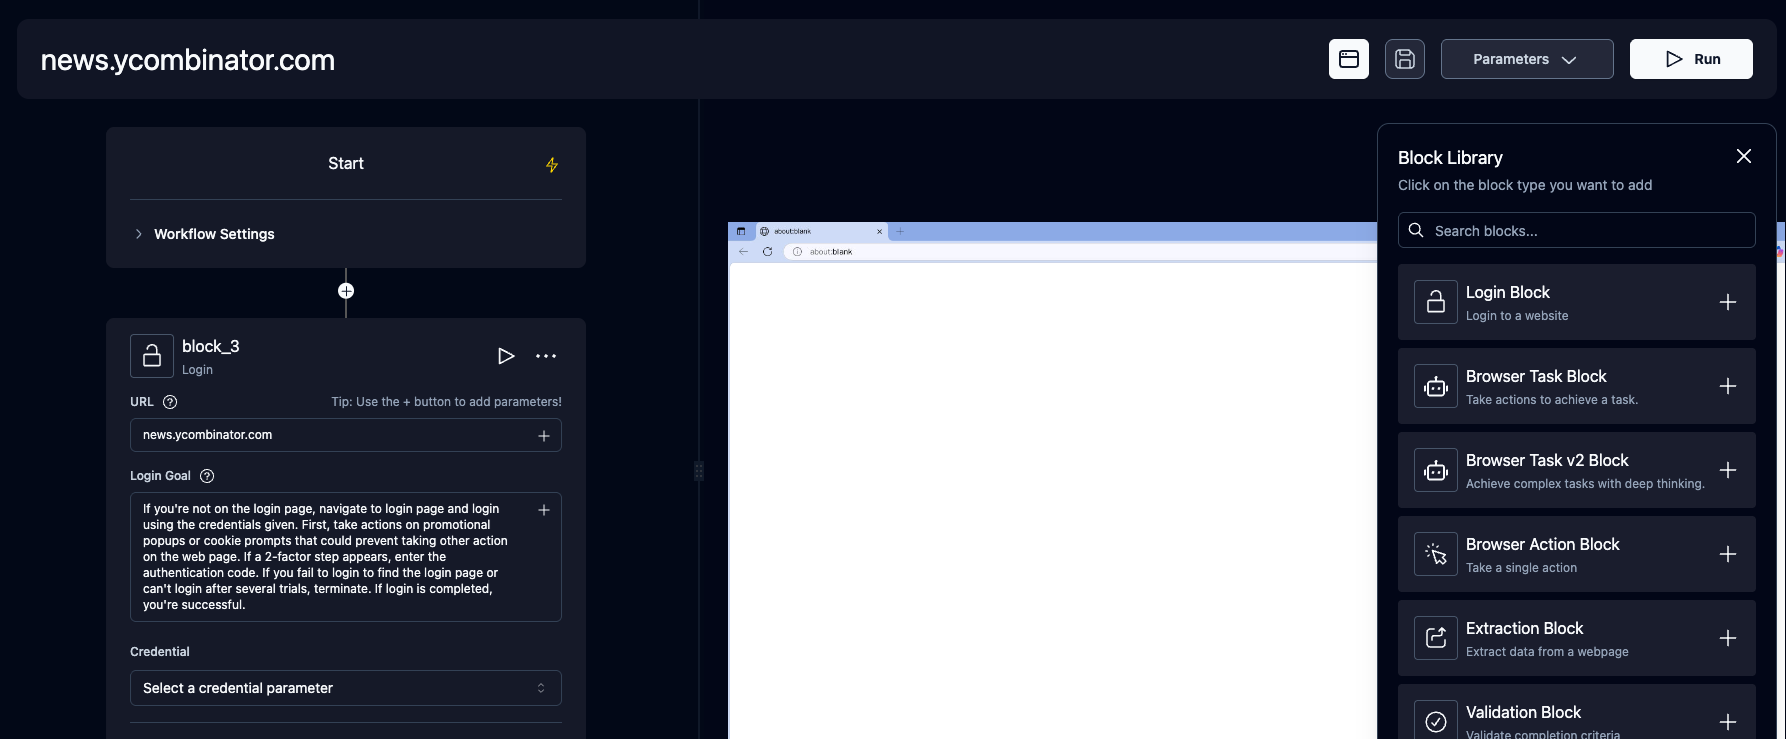
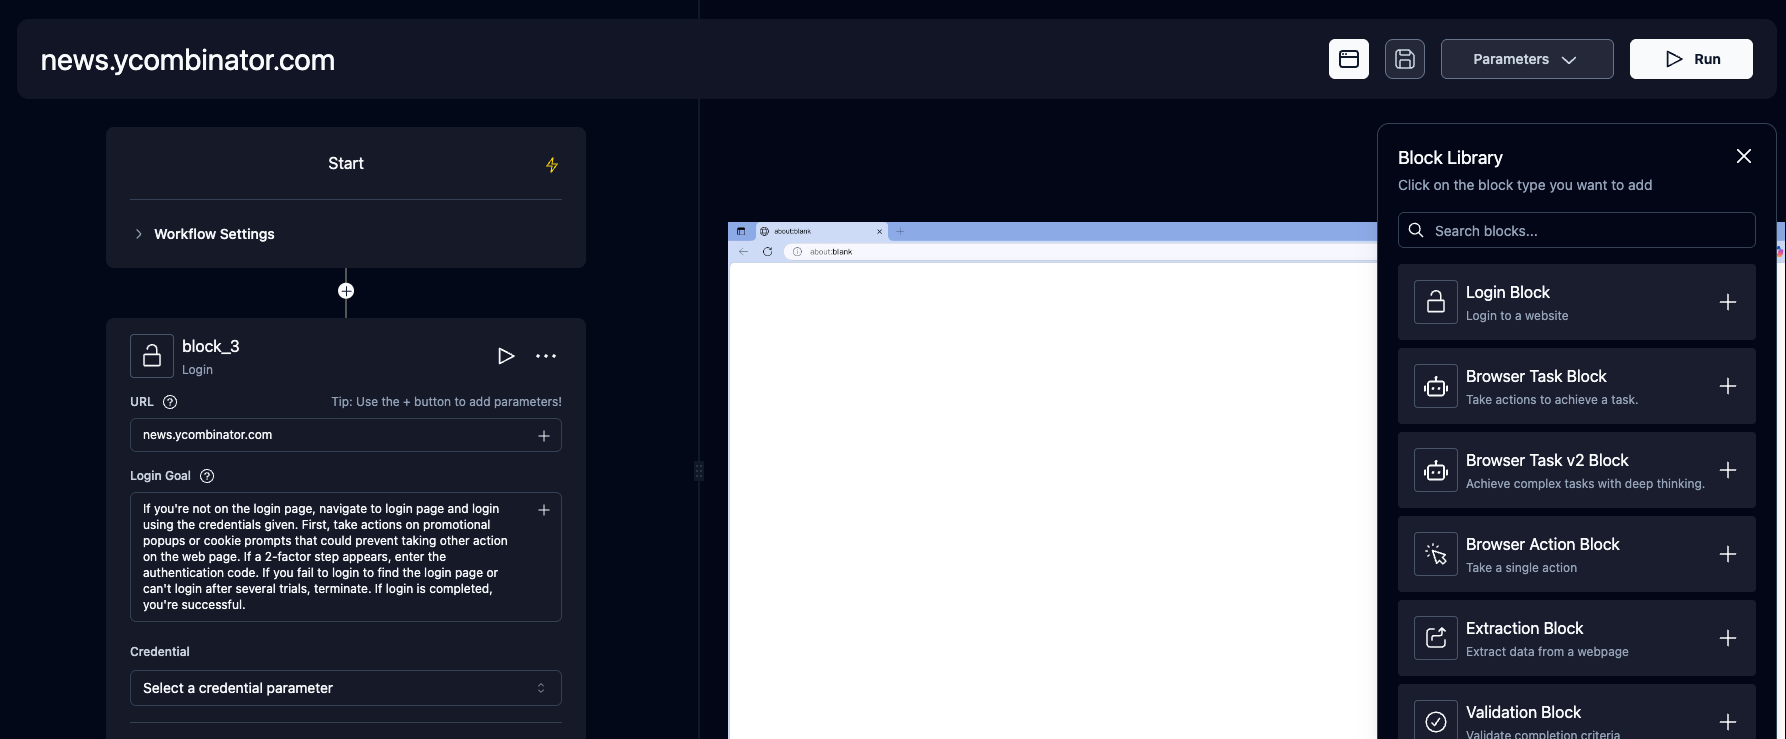
Workflows are a way to chain multiple tasks together to form a cohesive unit of work.
For example, if you wanted to download all invoices newer than January 1st, you could create a workflow that first navigated to the invoices page, then filtered down to only show invoices newer than January 1st, extracted a list of all eligible invoices, and iterated through each invoice to download it.
Another example is if you wanted to automate purchasing products from an e-commerce store, you could create a workflow that first navigated to the desired product, then added it to a cart. Second, it would navigate to the cart and validate the cart state. Finally, it would go through the checkout process to purchase the items.
Supported workflow features include:
- Browser Task
- Browser Action
- Data Extraction
- Validation
- For Loops
- File parsing
- Sending emails
- Text Prompts
- HTTP Request Block
- Custom Code Block
- Uploading files to block storage
- (Coming soon) Conditionals
Livestreaming
Skyvern allows you to livestream the viewport of the browser to your local machine so that you can see exactly what Skyvern is doing on the web. This is useful for debugging and understanding how Skyvern is interacting with a website, and intervening when necessary
Form Filling
Skyvern is natively capable of filling out form inputs on websites. Passing in information via the navigation_goal will allow Skyvern to comprehend the information and fill out the form accordingly.
Data Extraction
Skyvern is also capable of extracting data from a website.
You can also specify a data_extraction_schema directly within the main prompt to tell Skyvern exactly what data you'd like to extract from the website, in jsonc format. Skyvern's output will be structured in accordance to the supplied schema.
File Downloading
Skyvern is also capable of downloading files from a website. All downloaded files are automatically uploaded to block storage (if configured), and you can access them via the UI.
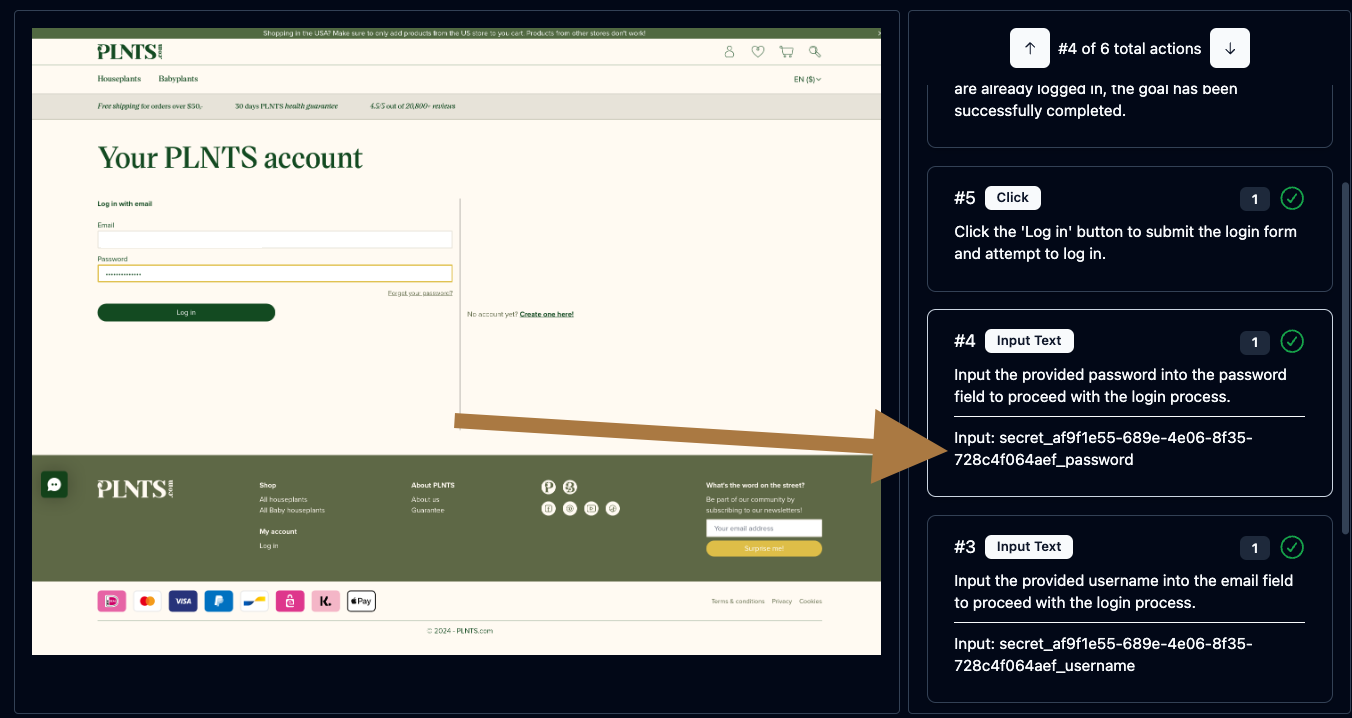
Authentication
Skyvern supports a number of different authentication methods to make it easier to automate tasks behind a login. If you'd like to try it out, please reach out to us via email or discord.
🔐 2FA Support (TOTP)
Skyvern supports a number of different 2FA methods to allow you to automate workflows that require 2FA.
Examples include:
- QR-based 2FA (e.g. Google Authenticator, Authy)
- Email based 2FA
- SMS based 2FA
🔐 Learn more about 2FA support here.
Password Manager Integrations
Skyvern currently supports the following password manager integrations:
- Bitwarden
- Custom Credential Service (HTTP API)
- 1Password
- LastPass
Model Context Protocol (MCP)
Skyvern supports the Model Context Protocol (MCP) to allow you to use any LLM that supports MCP.
See the MCP documentation here
Zapier / Make.com / N8N Integration
Skyvern supports Zapier, Make.com, and N8N to allow you to connect your Skyvern workflows to other apps.
🔐 Learn more about 2FA support here.
Real-world examples of Skyvern
We love to see how Skyvern is being used in the wild. Here are some examples of how Skyvern is being used to automate workflows in the real world. Please open PRs to add your own examples!
Invoice Downloading on many different websites
Automate the job application process
Automate materials procurement for a manufacturing company
Navigating to government websites to register accounts or fill out forms
Filling out random contact us forms
Retrieving insurance quotes from insurance providers in any language
Contributor Setup
Make sure to have uv installed.
- Run this to create your virtual environment (.venv)
uv sync --group dev
- Perform initial server configuration
uv run skyvern quickstart
- Navigate to http://localhost:8080 in your browser to start using the UI
The Skyvern CLI supports Windows, WSL, macOS, and Linux environments.
Documentation
More extensive documentation can be found on our 📕 docs page. Please let us know if something is unclear or missing by opening an issue or reaching out to us via email or discord.