MCP Registry
Notion MCP Server
Note
For the best experience, use Remote Notion MCP,
our official hosted MCP server. This repository is a separate, self-hosted MCP
server implementation that is no longer actively maintained or supported. Please
use Remote Notion MCP instead. It is purpose-built to give AI agents
faster results using far fewer tokens.
Remote Notion MCP can search your workspace and connected apps semantically, read and
edit pages in Markdown, and return only the most relevant context. That means less
time waiting, less context-window usage, and lower token costs. It also uses OAuth
and automatically respects each user's existing Notion permissions—without API
tokens, JSON configuration, manual page sharing, or a local server to maintain.
- Remote Notion MCP
- Fast, hosted experience: ✅
- Token-efficient responses: ✅
- Powerful tools tailored for AI agents: ✅
- Semantic search across your Notion workspace: ✅
- AI Connector search across connected apps: ✅
- Markdown-native page reading and editing: ✅
- Seamless OAuth setup: ✅
- Respects each user's existing Notion permissions: ✅
- Active support and ongoing improvements: ✅
- Fast, hosted experience: Runs and updates locally
- Token-efficient responses: Limited
- Powerful tools tailored for AI agents: Basic API-derived tools
- Semantic search across your Notion workspace: Keyword search only
- AI Connector search across connected apps: Not available
- Markdown-native page reading and editing: Limited to two page-content tools
- Seamless OAuth setup: Manual token and JSON configuration
- Respects each user's existing Notion permissions: Manual integration permissions and page sharing
- Active support and ongoing improvements: Not actively supported
Learn more and get started in the Remote Notion MCP documentation.
We are prioritizing, and only providing active support for, Remote Notion MCP. As a result:
- We may sunset this local MCP server repository in the future.
- Issues and pull requests here are not actively monitored.
- Please do not file issues relating to the remote MCP here; instead, contact Notion support.

This project implements an MCP server for the Notion API.
⚠️ Version 2.0.0 breaking changes
Version 2.0.0 migrates to the Notion API 2025-09-03 which introduces data sources as the primary abstraction for databases.
What changed
Removed tools (3):
- post-database-query - replaced by query-data-source
- update-a-database - replaced by update-a-data-source
- create-a-database - replaced by create-a-data-source
New tools (7):
- query-data-source - Query a data source (database) with filters and sorts
- retrieve-a-data-source - Get metadata and schema for a data source
- update-a-data-source - Update data source properties
- create-a-data-source - Create a new data source
- list-data-source-templates - List available templates in a data source
- move-page - Move a page to a different parent location
- retrieve-a-database - Get database metadata including its data source IDs
Parameter changes:
- All database operations now use data_source_id instead of database_id
- Search filter values changed from ["page", "database"] to ["page", "data_source"]
- Page creation now supports both page_id and database_id parents (for data sources)
Do I need to migrate?
No code changes required. MCP tools are discovered automatically when the server starts. When you upgrade to v2.0.0, AI clients will automatically see the new tool names and parameters. The old database tools are no longer available.
If you have hardcoded tool names or prompts that reference the old database tools, update them to use the new data source tools:
- New Tool (v2.0)
- post-database-query: query-data-source
- update-a-database: update-a-data-source
- create-a-database: create-a-data-source
- post-database-query: database_id → data_source_id
- update-a-database: database_id → data_source_id
- create-a-database: No change (uses parent.page_id)
Note: retrieve-a-database is still available and returns database metadata including the list of data source IDs. Use retrieve-a-data-source to get the schema and properties of a specific data source.
Total tools now: 22 (was 19 in v1.x)
Page content as Markdown
The server exposes two tools for working with page content as enhanced Markdown instead of block JSON, which is significantly more token-efficient for AI agents:
- retrieve-page-markdown — Read a page's full content as Markdown (GET /v1/pages/{page_id}/markdown). Pass include_transcript: true to inline meeting-note transcripts.
- update-page-markdown — Edit a page's content with Markdown (PATCH /v1/pages/{page_id}/markdown). Prefer replace_content to overwrite the whole page, or update_content for targeted find-and-replace edits.
These endpoints require Notion API version 2026-03-11. The server now sources the Notion-Version header per operation from the OpenAPI spec, so these tools use 2026-03-11 while the rest of the API continues to use 2025-09-03 — no configuration needed. If you set Notion-Version yourself via OPENAPI_MCP_HEADERS, your value takes precedence for every tool.
Installation
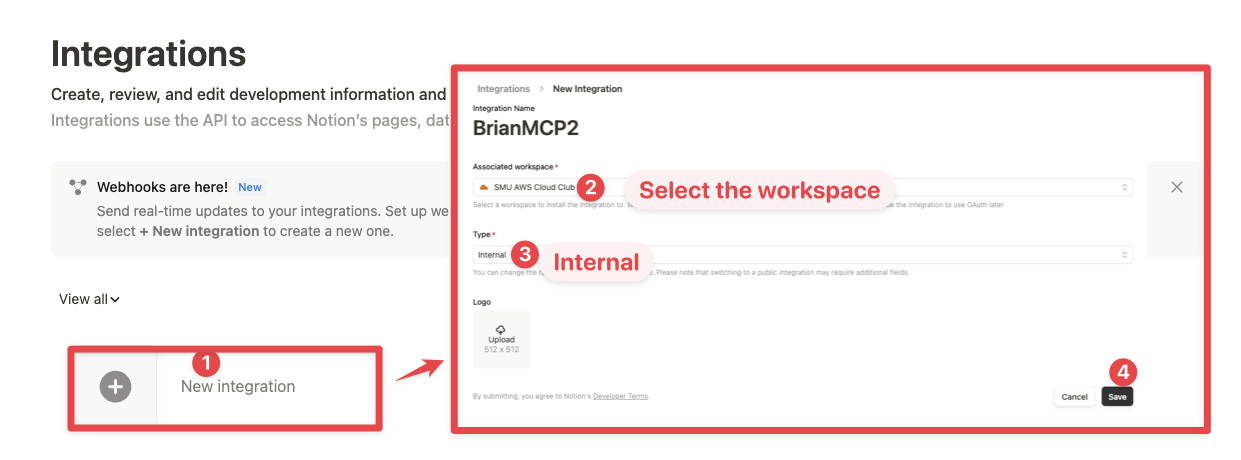
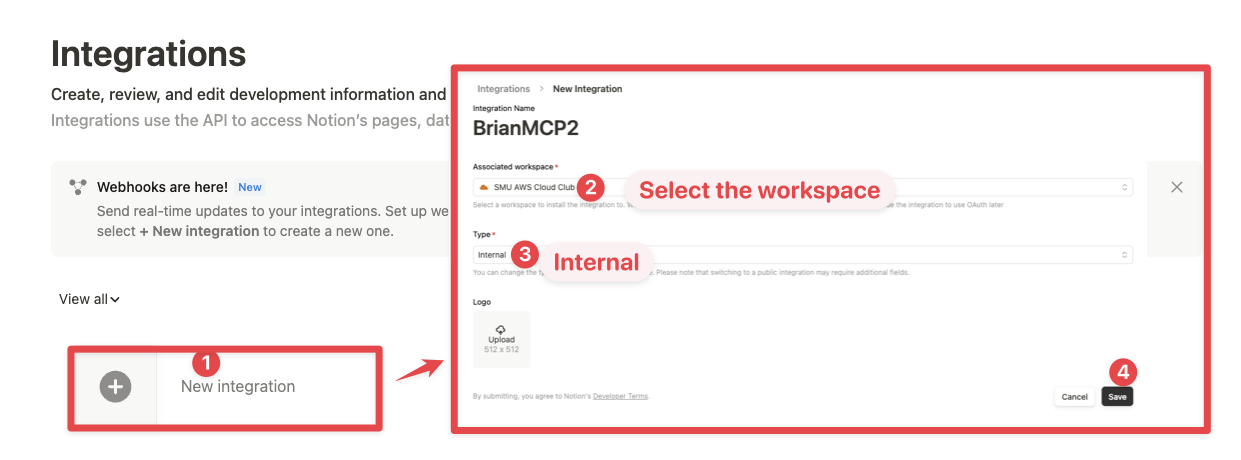
1. Setting up integration in Notion
Go to https://www.notion.so/profile/integrations and create a new internal integration or select an existing one.
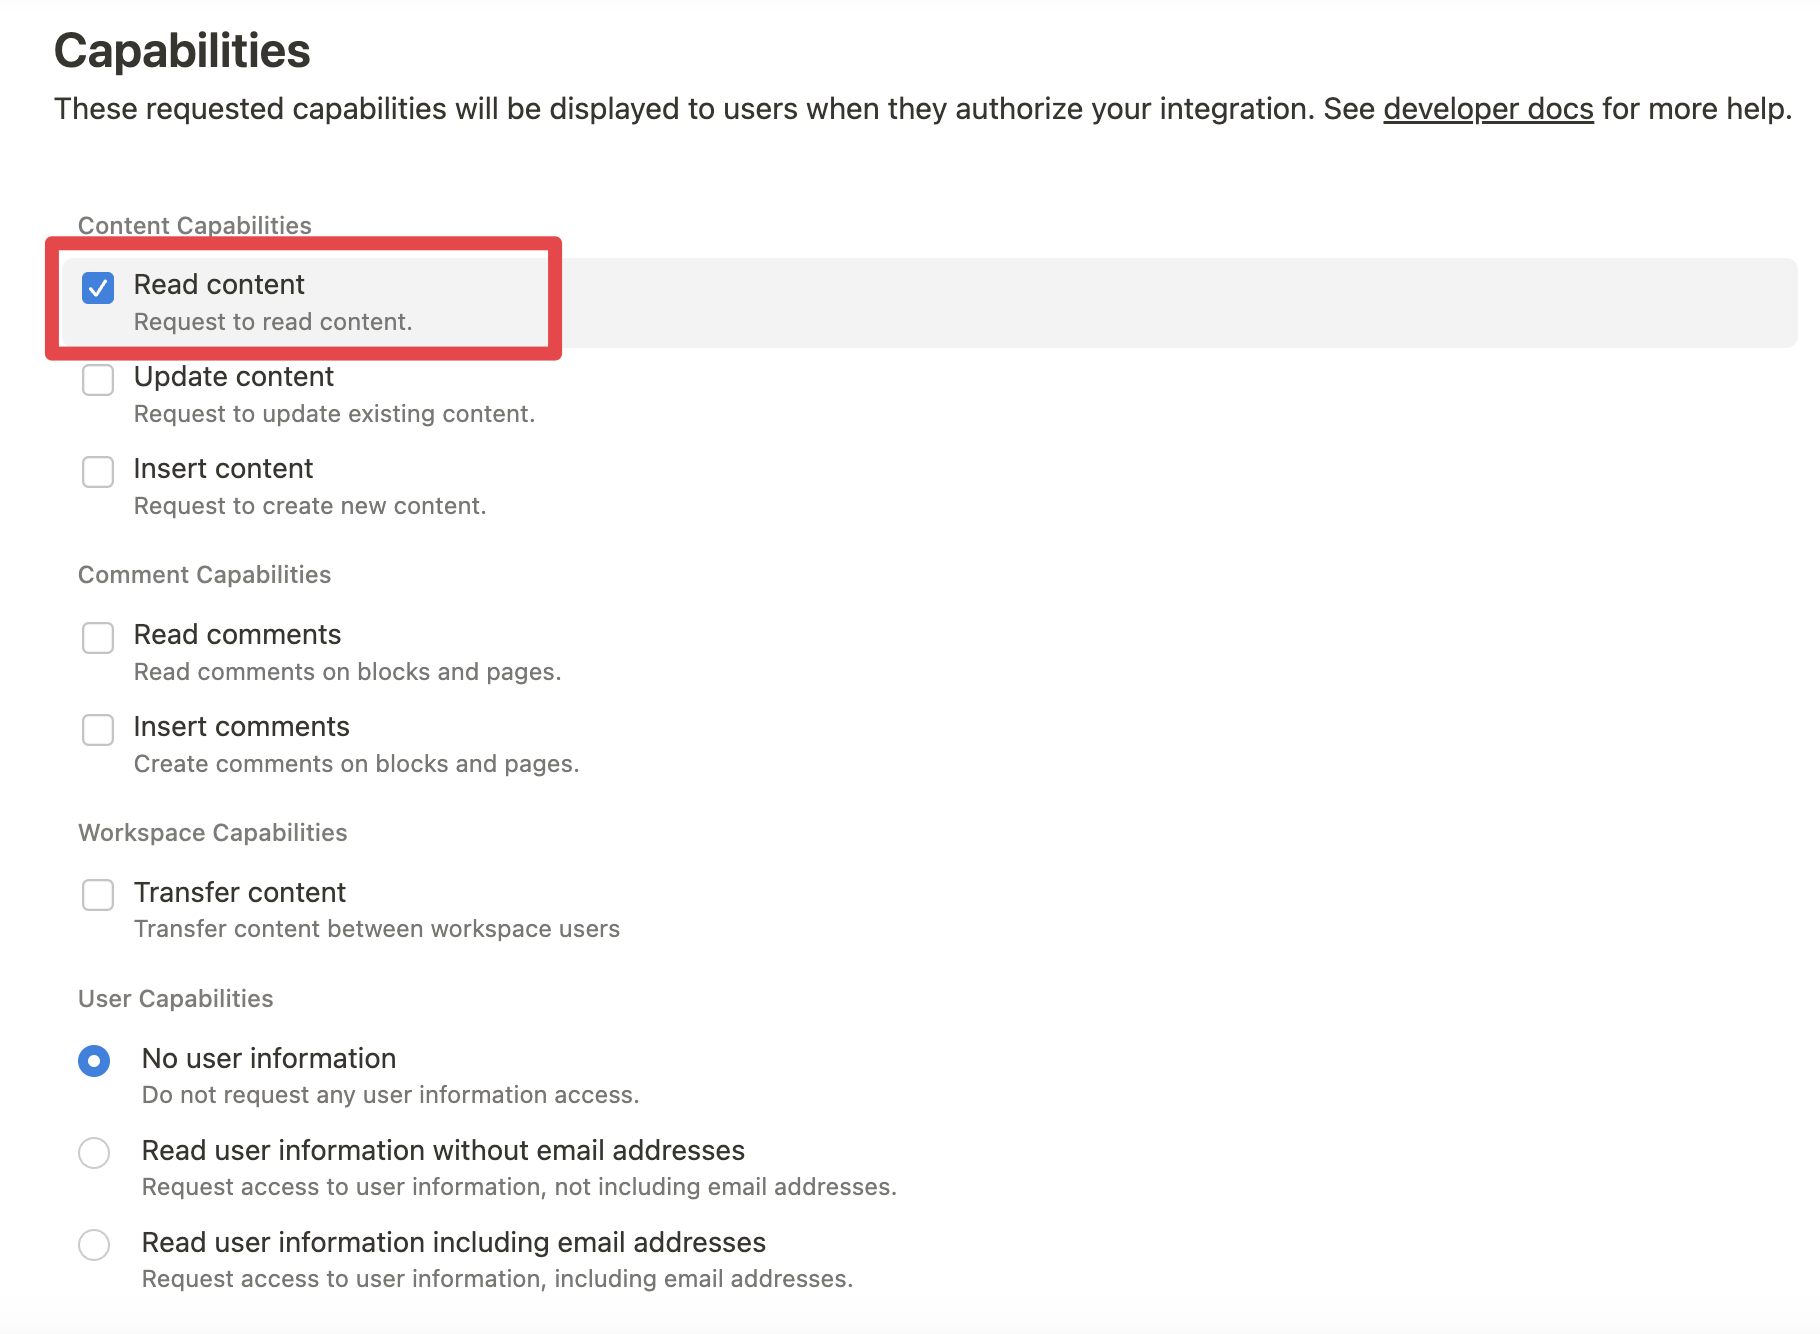
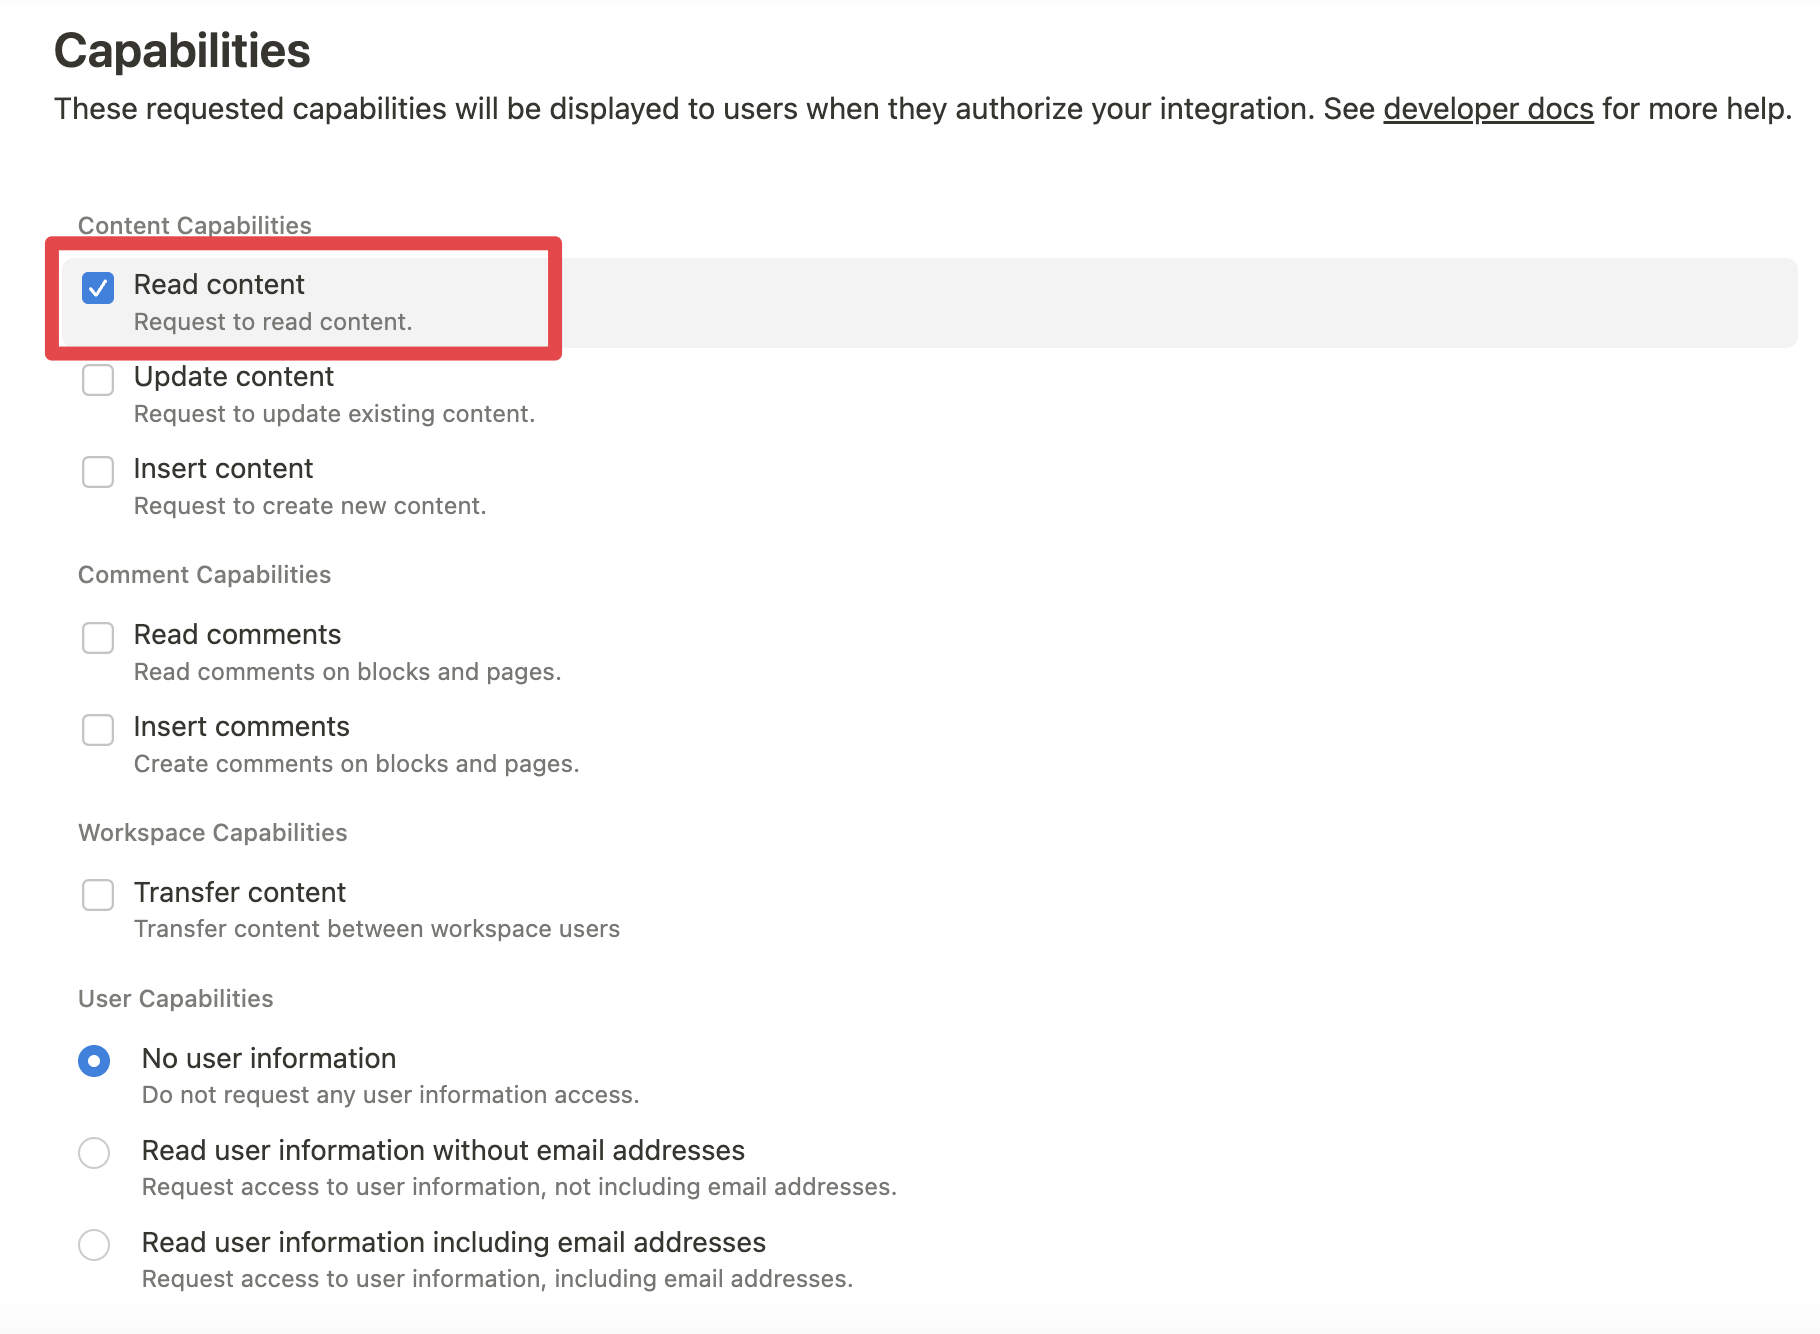
While we limit the scope of Notion API's exposed (for example, you will not be able to delete databases via MCP), there is a non-zero risk to workspace data by exposing it to LLMs. Security-conscious users may want to further configure the Integration's Capabilities.
For example, you can create a read-only integration token by giving only "Read content" access from the "Configuration" tab:
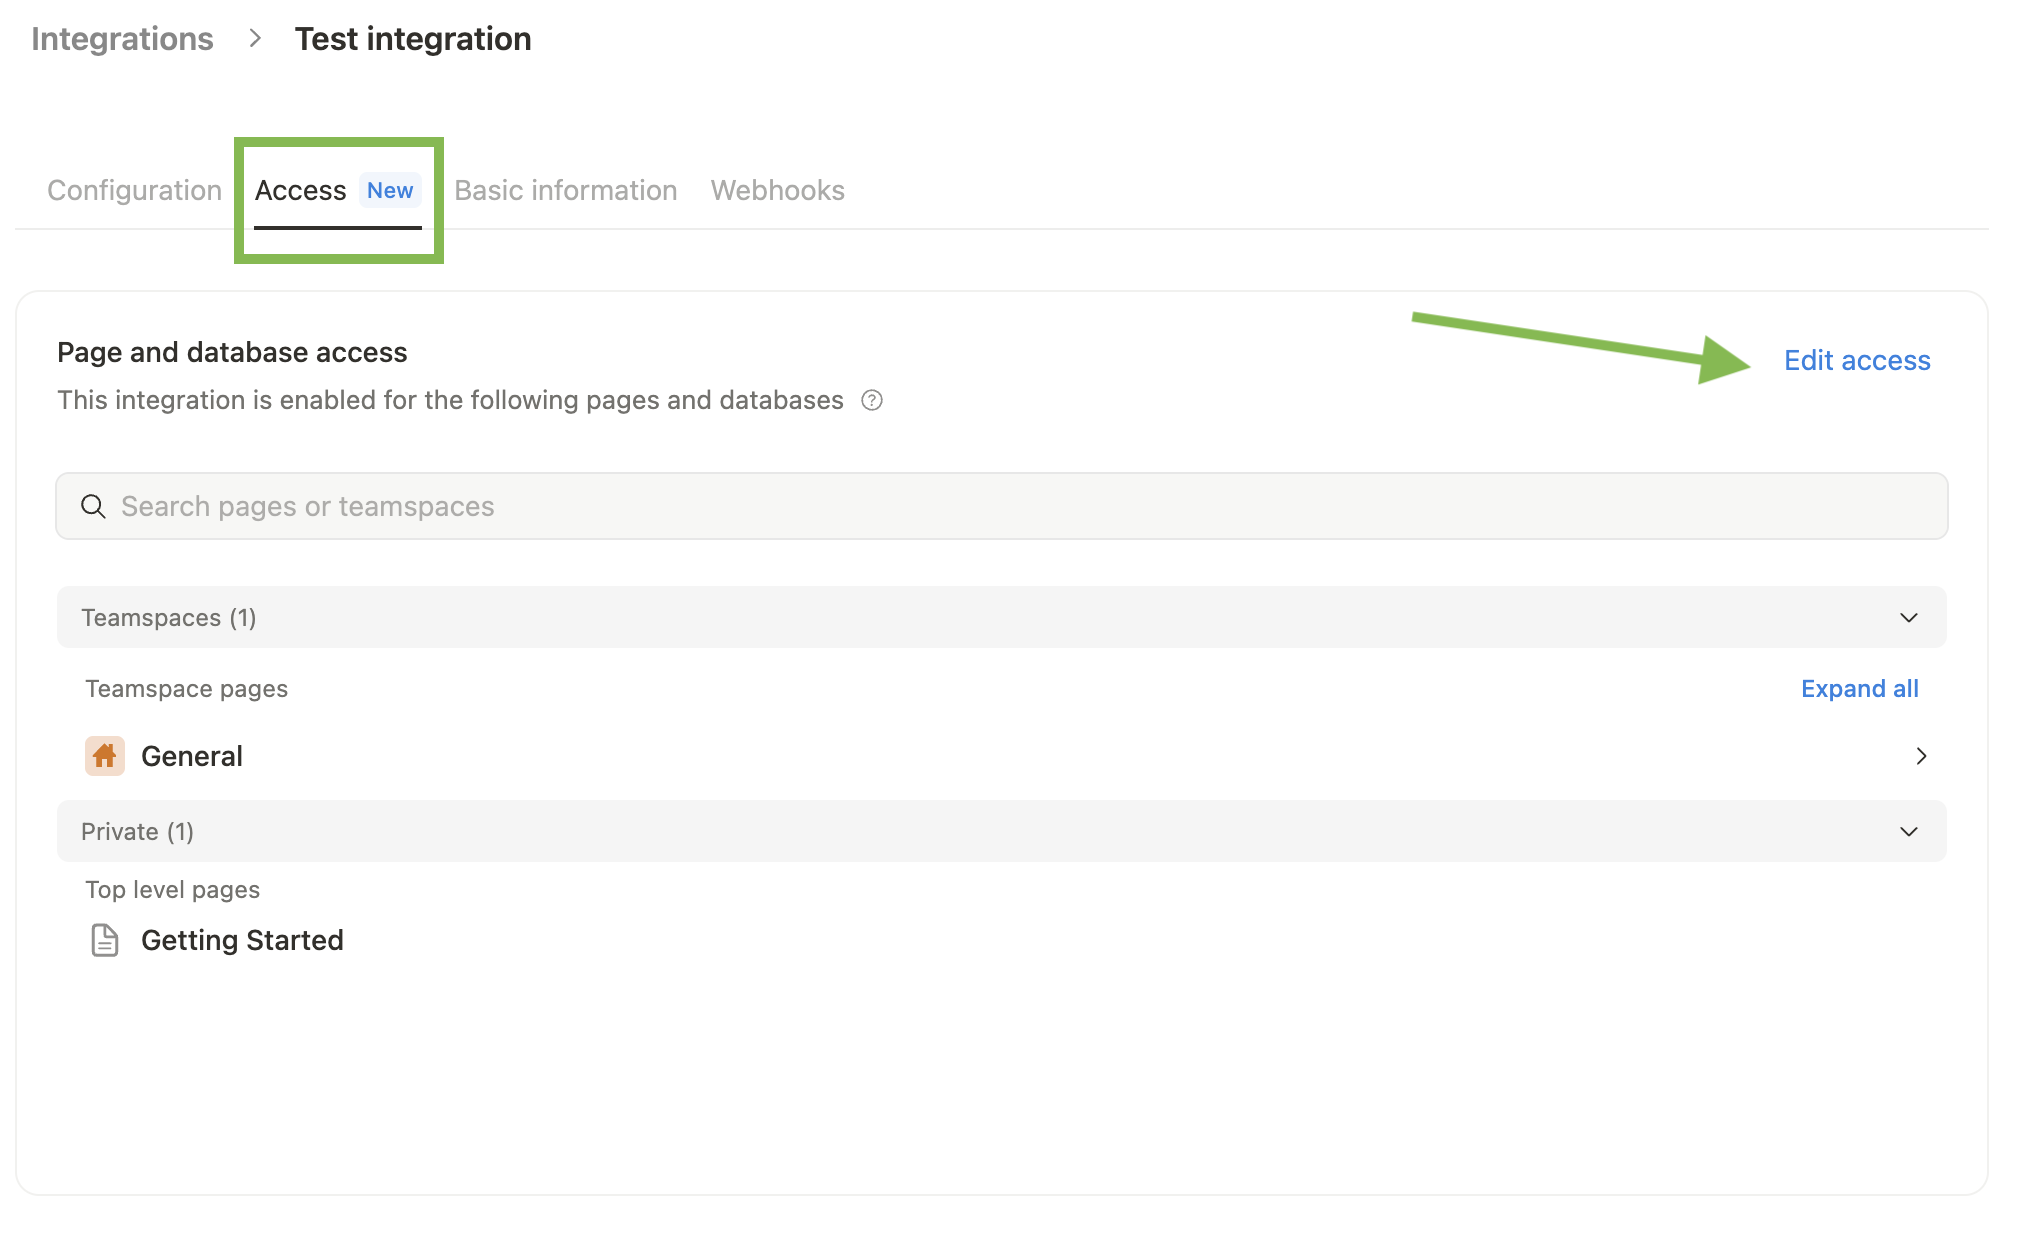
2. Connecting content to integration
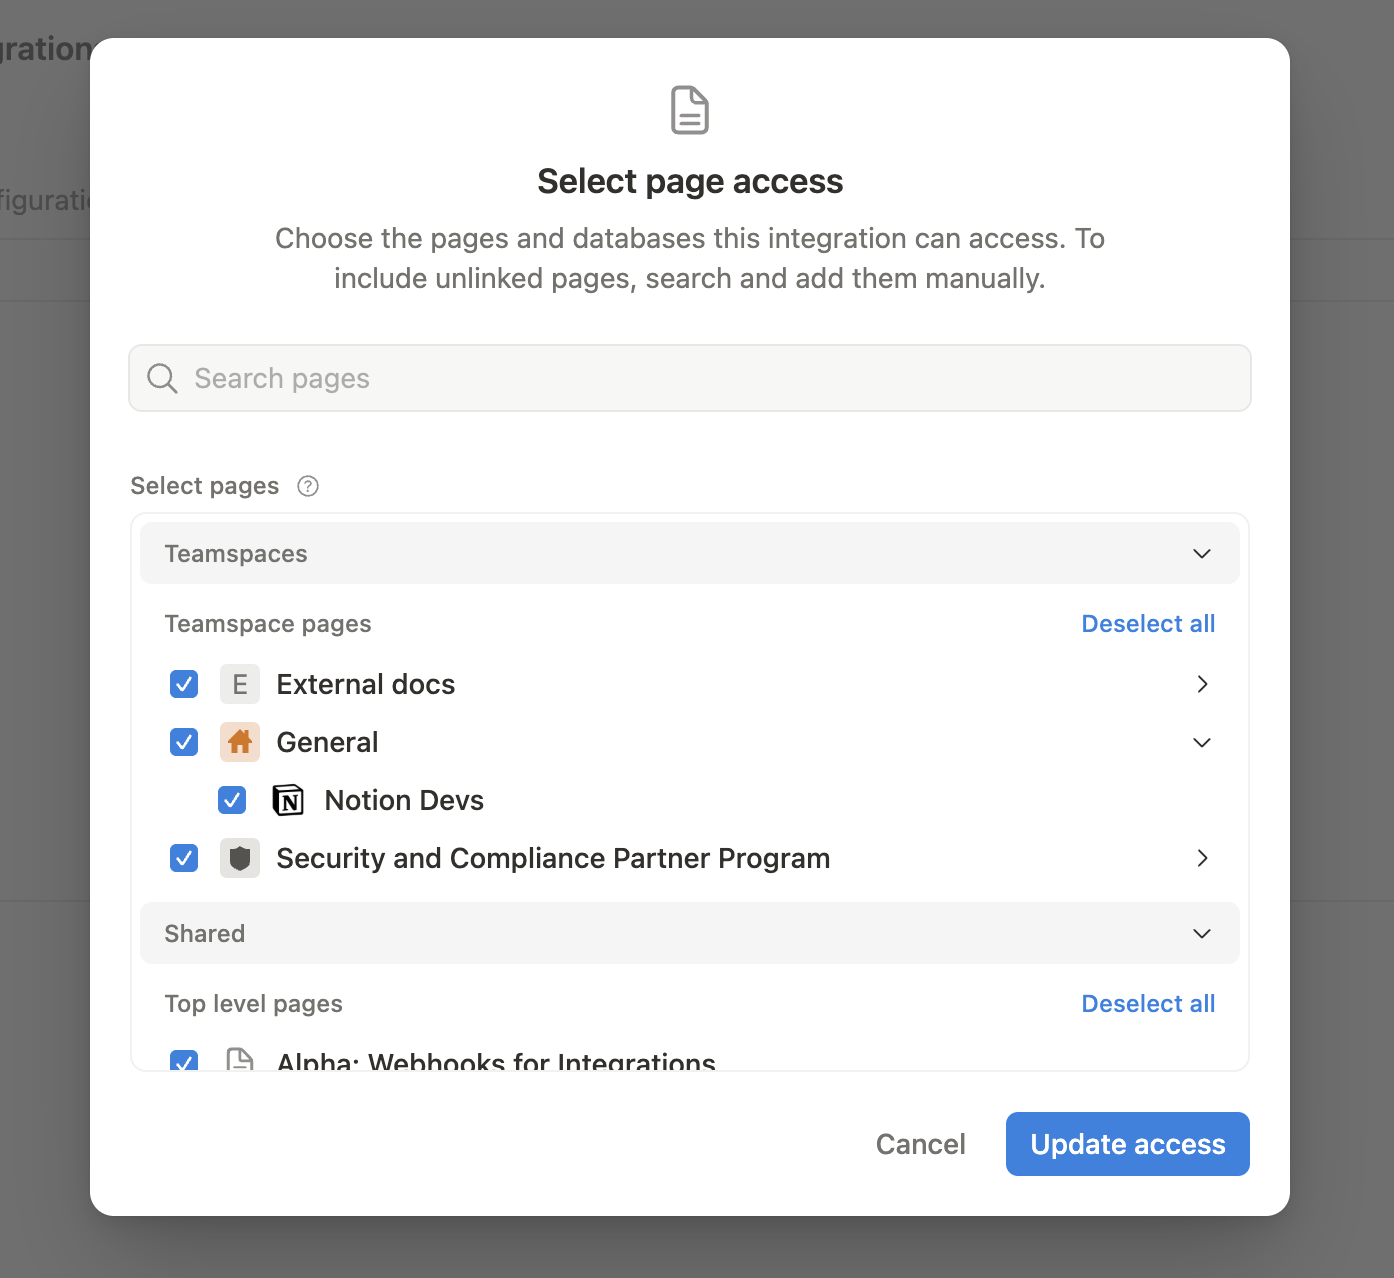
Ensure relevant pages and databases are connected to your integration.
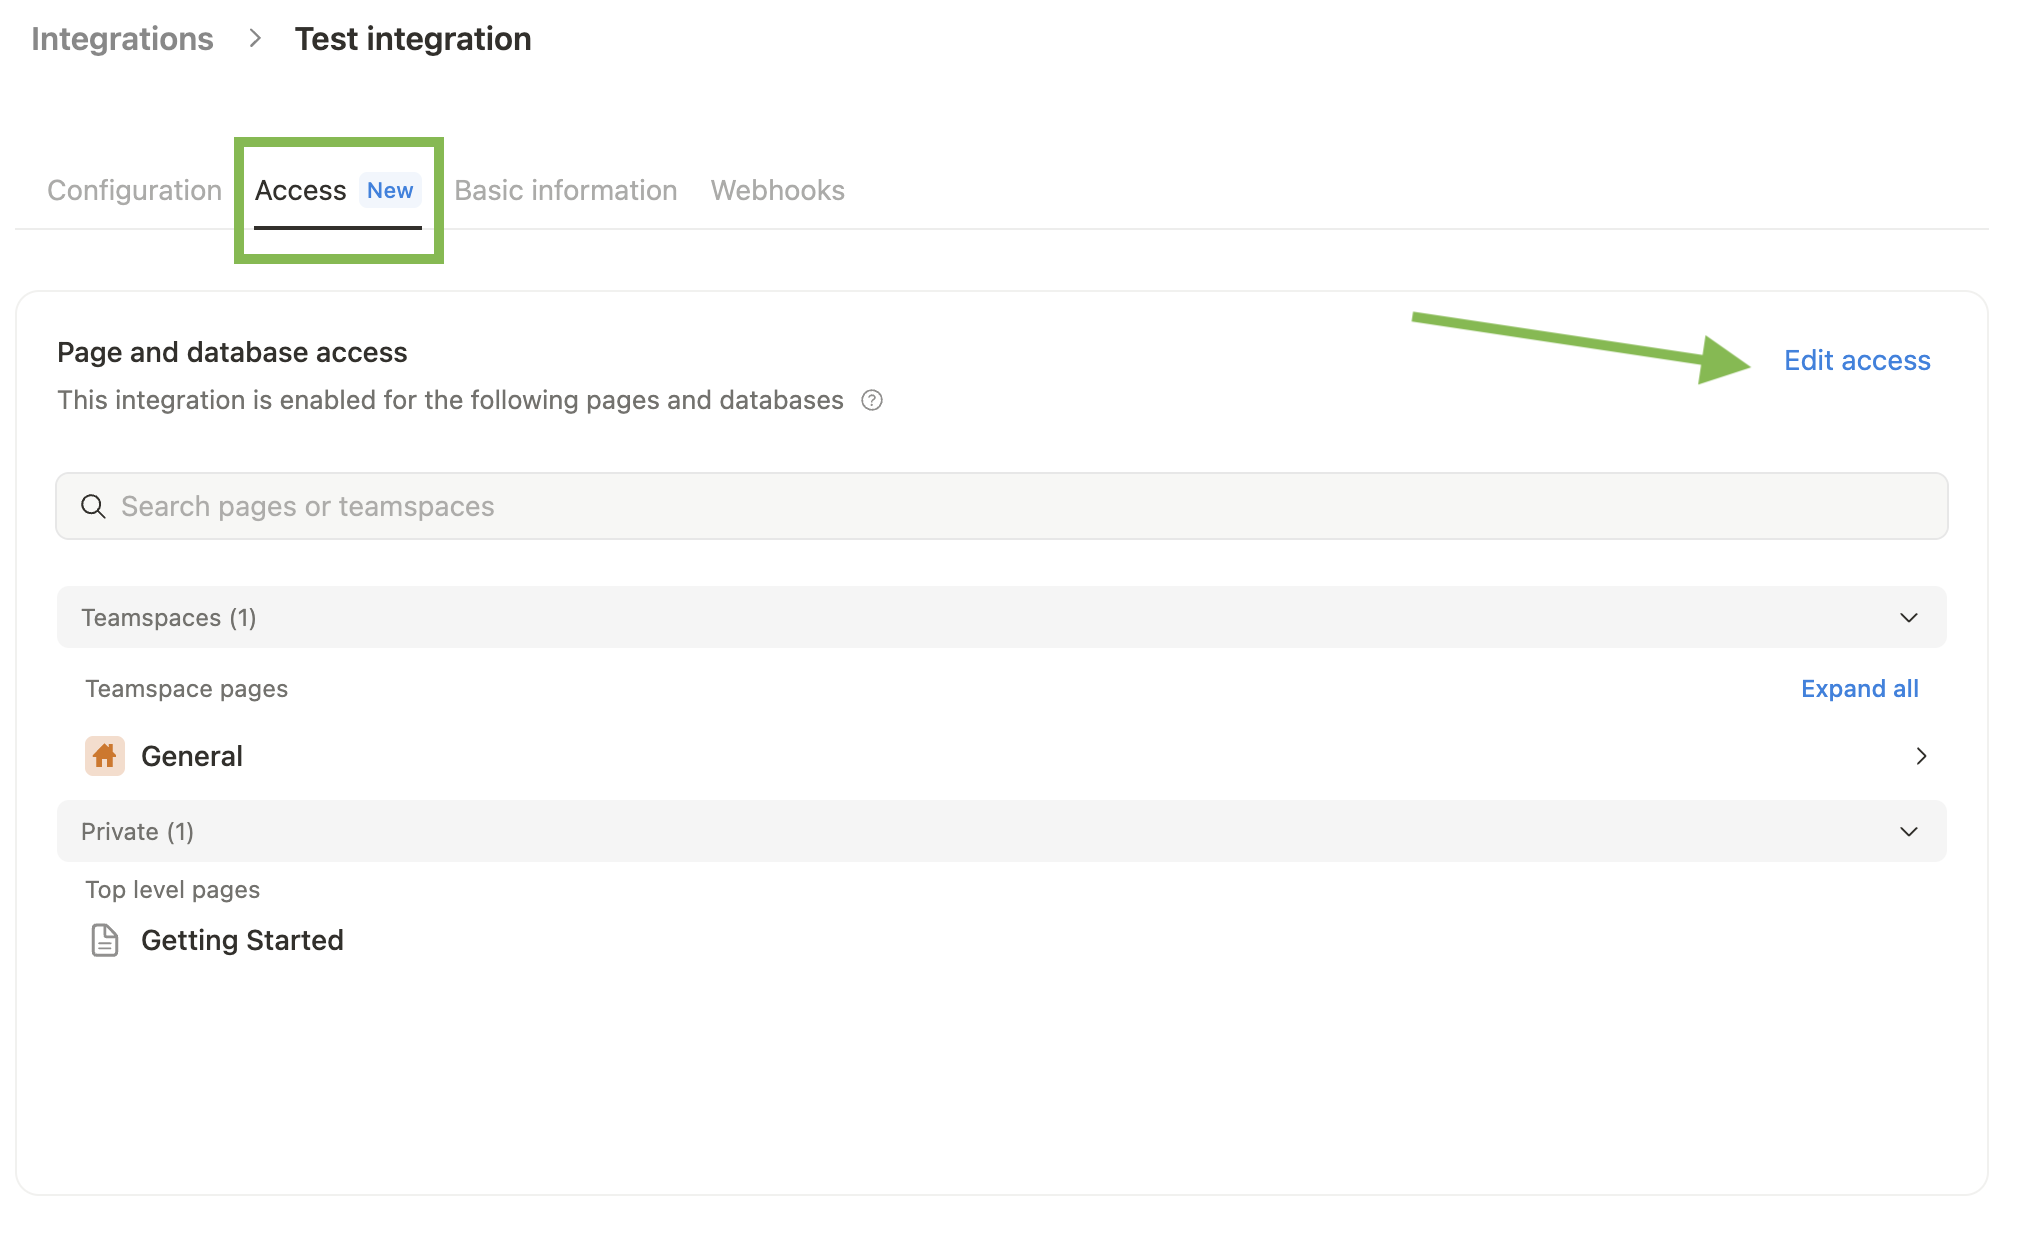
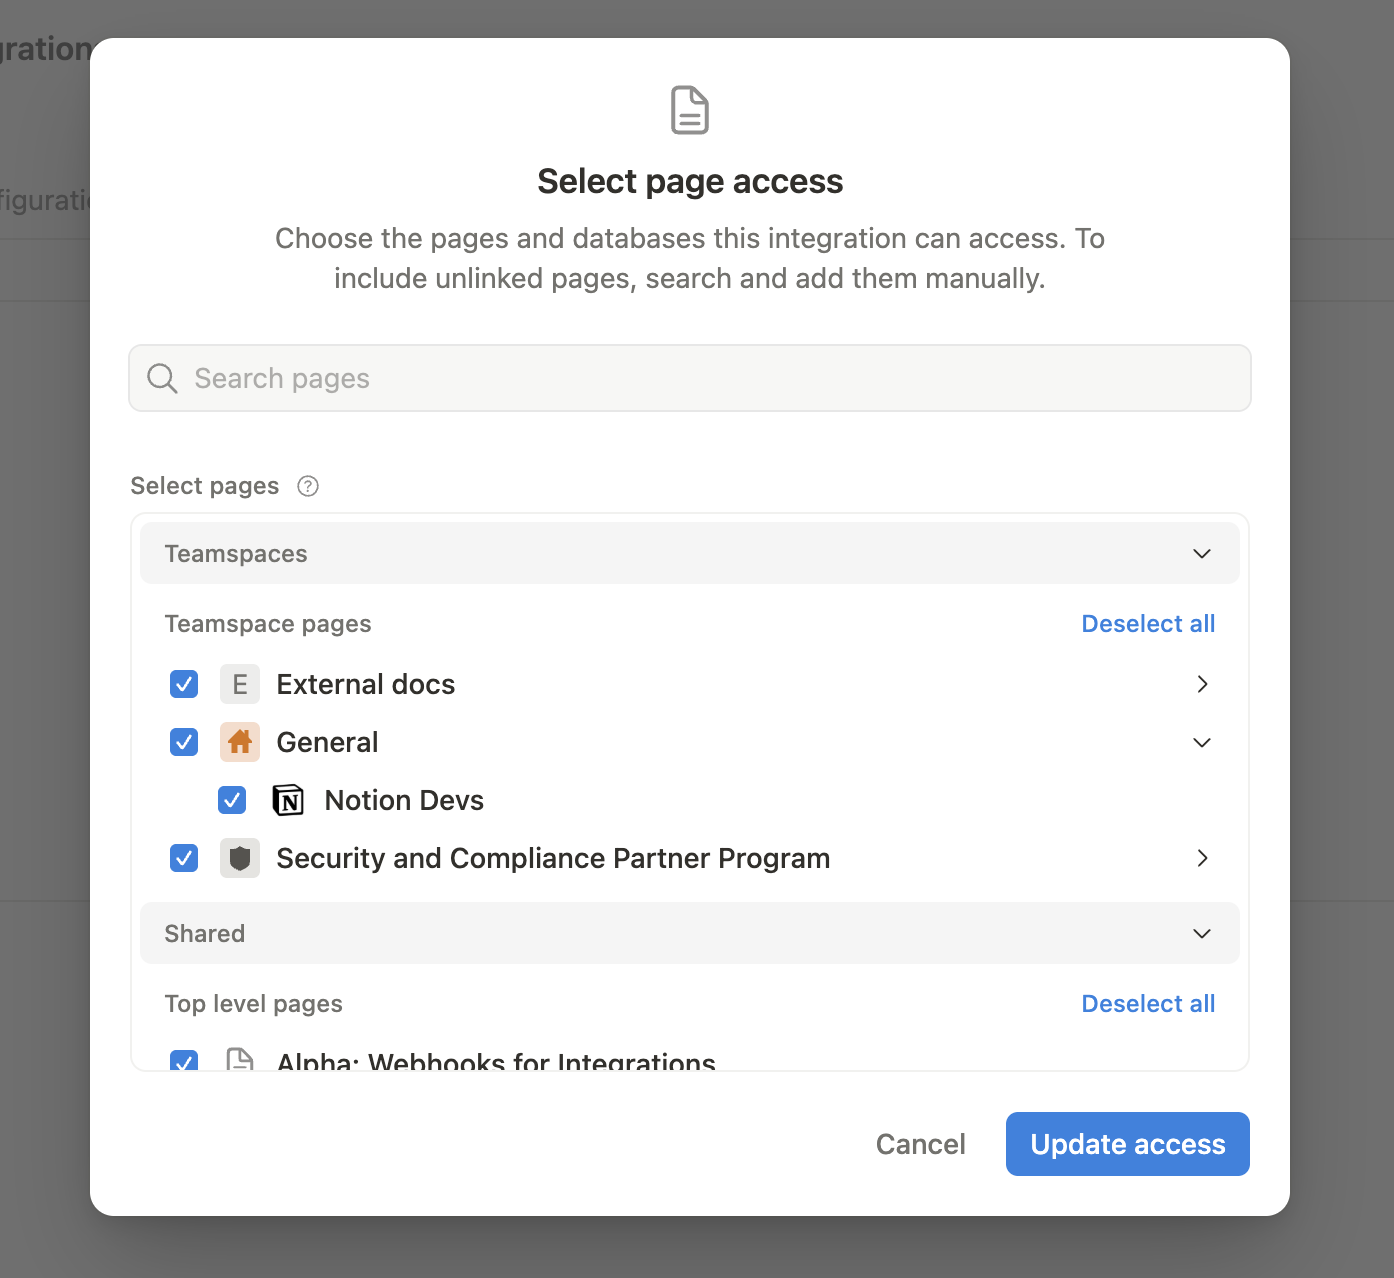
To do this, visit the Access tab in your internal integration settings. Edit access and select the pages you'd like to use.
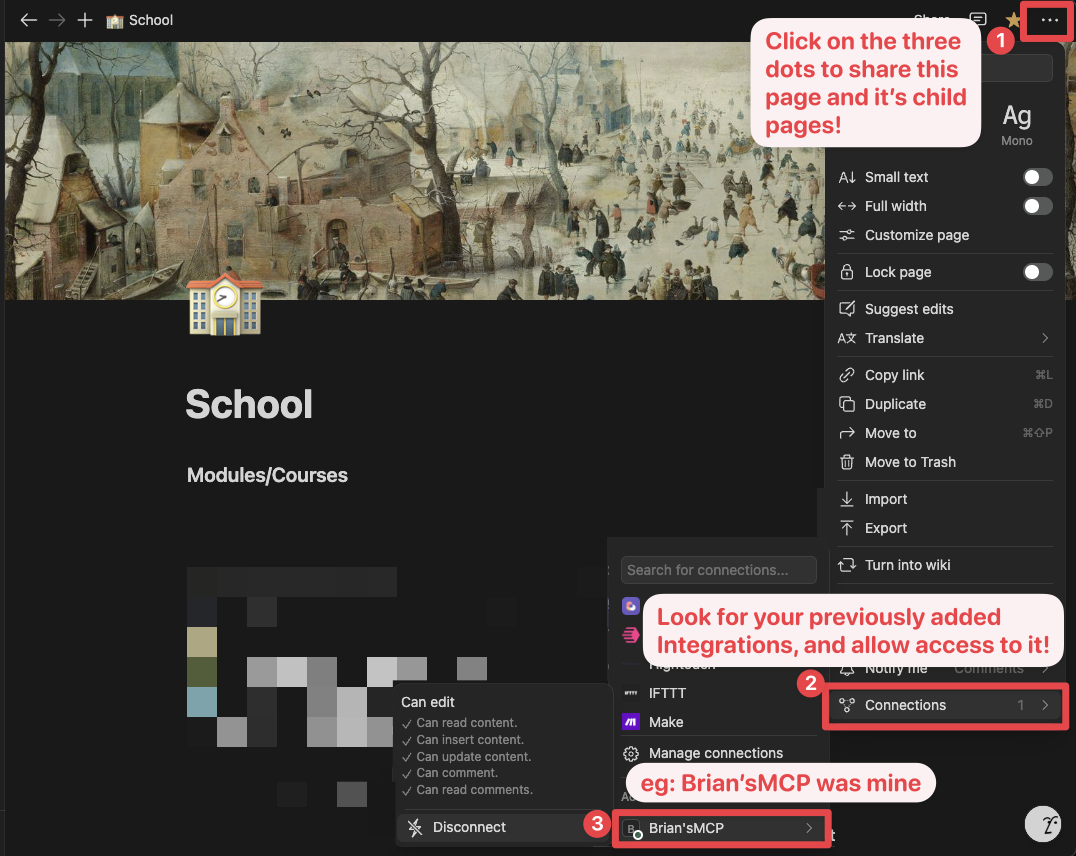
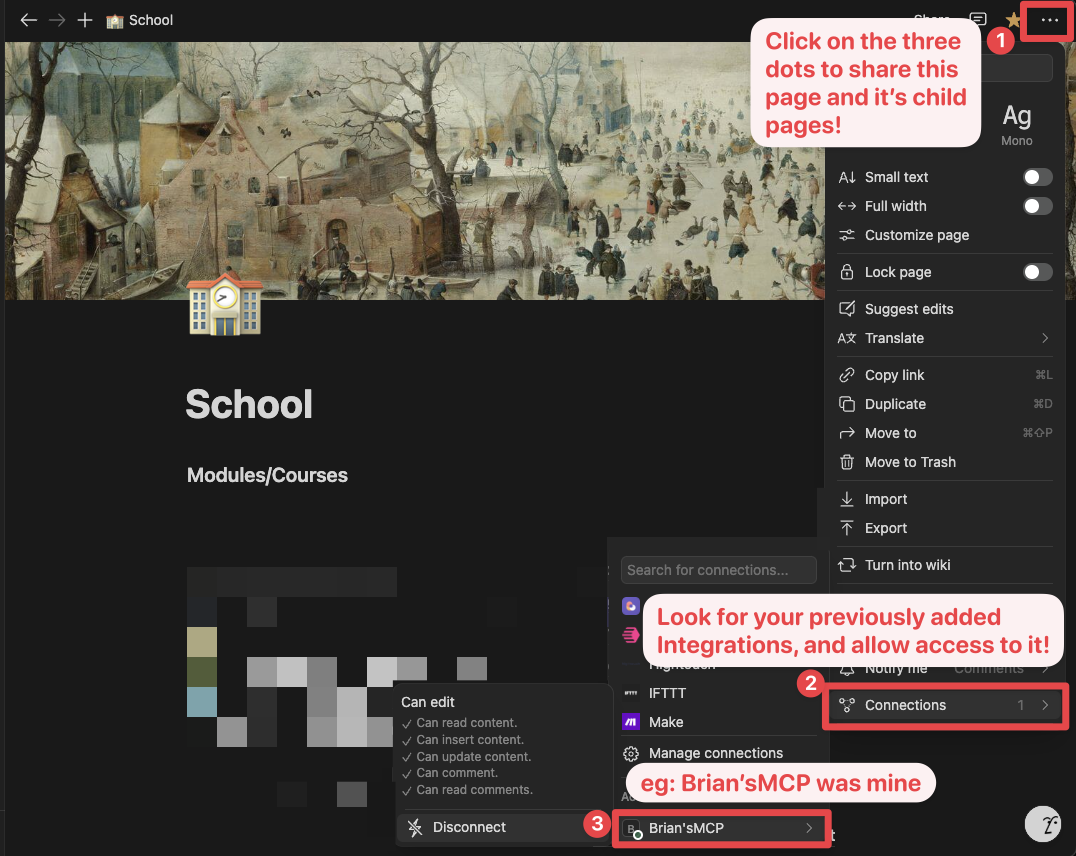
Alternatively, you can grant page access individually. You'll need to visit the target page, and click on the 3 dots, and select "Connect to integration".
3. Adding MCP config to your client
Using npm
Cursor & Claude
Add the following to your .cursor/mcp.json or claude_desktop_config.json (MacOS: ~/Library/Application\ Support/Claude/claude_desktop_config.json)
Option 1: Using NOTION_TOKEN (recommended)
{ "mcpServers": { "notionApi": { "command": "npx", "args": ["-y", "@notionhq/notion-mcp-server"], "env": { "NOTION_TOKEN": "ntn_****" } } } }
Option 2: Using OPENAPI_MCP_HEADERS (for advanced use cases)
{ "mcpServers": { "notionApi": { "command": "npx", "args": ["-y", "@notionhq/notion-mcp-server"], "env": { "OPENAPI_MCP_HEADERS": "{\"Authorization\": \"Bearer ntn_****\", \"Notion-Version\": \"2025-09-03\" }" } } } }
Zed
Add the following to your settings.json
{ "context_servers": { "some-context-server": { "command": { "path": "npx", "args": ["-y", "@notionhq/notion-mcp-server"], "env": { "OPENAPI_MCP_HEADERS": "{\"Authorization\": \"Bearer ntn_****\", \"Notion-Version\": \"2025-09-03\" }" } }, "settings": {} } } }
GitHub Copilot CLI
Use the Copilot CLI to interactively add the MCP server:
/mcp add
Alternatively, create or edit the configuration file ~/.copilot/mcp-config.json and add:
{ "mcpServers": { "notionApi": { "command": "npx", "args": ["-y", "@notionhq/notion-mcp-server"], "env": { "NOTION_TOKEN": "ntn_****" } } } }
For more information, see the Copilot CLI documentation.
Using Docker
There are two options for running the MCP server with Docker:
Option 1: Using the official Docker Hub image
Add the following to your .cursor/mcp.json or claude_desktop_config.json
Using NOTION_TOKEN (recommended):
{ "mcpServers": { "notionApi": { "command": "docker", "args": [ "run", "--rm", "-i", "-e", "NOTION_TOKEN", "mcp/notion" ], "env": { "NOTION_TOKEN": "ntn_****" } } } }
Using OPENAPI_MCP_HEADERS (for advanced use cases):
{ "mcpServers": { "notionApi": { "command": "docker", "args": [ "run", "--rm", "-i", "-e", "OPENAPI_MCP_HEADERS", "mcp/notion" ], "env": { "OPENAPI_MCP_HEADERS": "{\"Authorization\":\"Bearer ntn_****\",\"Notion-Version\":\"2025-09-03\"}" } } } }
This approach:
- Uses the official Docker Hub image
- Properly handles JSON escaping via environment variables
- Provides a more reliable configuration method
Option 2: Building the Docker image locally
You can also build and run the Docker image locally. First, build the Docker image:
docker compose build
Then, add the following to your .cursor/mcp.json or claude_desktop_config.json
Using NOTION_TOKEN (recommended):
{ "mcpServers": { "notionApi": { "command": "docker", "args": [ "run", "--rm", "-i", "-e", "NOTION_TOKEN=ntn_****", "notion-mcp-server" ] } } }
Using OPENAPI_MCP_HEADERS (for advanced use cases):
{ "mcpServers": { "notionApi": { "command": "docker", "args": [ "run", "--rm", "-i", "-e", "OPENAPI_MCP_HEADERS={\"Authorization\": \"Bearer ntn_****\", \"Notion-Version\": \"2025-09-03\"}", "notion-mcp-server" ] } } }
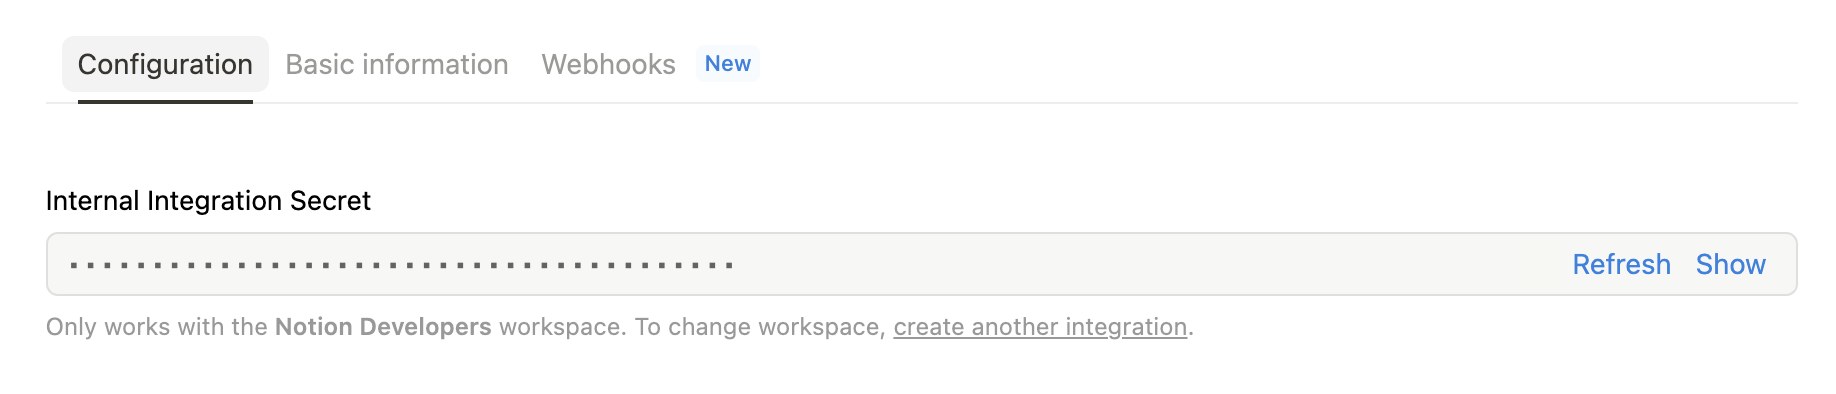
Don't forget to replace ntn_**** with your integration secret. Find it from your integration configuration tab:
Transport options
The Notion MCP Server supports two transport modes:
STDIO transport (default)
The default transport mode uses standard input/output for communication. This is the standard MCP transport used by most clients like Claude Desktop.
Run with default stdio transport
npx @notionhq/notion-mcp-server
Or explicitly specify stdio
npx @notionhq/notion-mcp-server --transport stdio
Streamable HTTP transport
For web-based applications or clients that prefer HTTP communication, you can use the Streamable HTTP transport:
Run with Streamable HTTP transport on port 3000 (default)
npx @notionhq/notion-mcp-server --transport http
Run on a custom port
npx @notionhq/notion-mcp-server --transport http --port 8080
Bind to a different host. The default is 127.0.0.1.
npx @notionhq/notion-mcp-server --transport http --host 0.0.0.0
Run with a custom authentication token
npx @notionhq/notion-mcp-server --transport http --auth-token "your-secret-token"
When using Streamable HTTP transport, the server will be available at http://127.0.0.1:<port>/mcp by default.
Authentication
The Streamable HTTP transport requires bearer token authentication for security. You have three options:
Option 1: Auto-generated token (only for development)
npx @notionhq/notion-mcp-server --transport http
The server will generate a secure random token and write it to a file with restricted permissions:
Generated auth token written to: /tmp/.notion-mcp-auth-token-12345Option 2: Custom token via command line (recommended for production)
npx @notionhq/notion-mcp-server --transport http --auth-token "your-secret-token"
Option 3: Custom token via environment variable (recommended for production)
AUTH_TOKEN="your-secret-token" npx @notionhq/notion-mcp-server --transport http
The command line argument --auth-token takes precedence over the AUTH_TOKEN environment variable if both are provided.
Unsafe option: disable HTTP authentication
You can disable bearer token authentication only with the explicit unsafe flag:
npx @notionhq/notion-mcp-server --transport http --unsafe-disable-auth
WARNING: --unsafe-disable-auth is unsafe. The server may be reachable to pages you visit via DNS rebinding. Only use it on an isolated network.
When authentication is disabled, the server enables DNS rebinding protection by checking the Host and Origin headers against the configured local host and loopback hosts. The previous --disable-auth flag is still accepted as a deprecated alias, but it will print a warning.
Making HTTP requests
All requests to the Streamable HTTP transport must include the bearer token in the Authorization header:
Example request
curl -H "Authorization: Bearer your-token-here" \ -H "Content-Type: application/json" \ -H "mcp-session-id: your-session-id" \ -d '{"jsonrpc": "2.0", "method": "initialize", "params": {}, "id": 1}' \ http://localhost:3000/mcp
Note: Make sure to set either the NOTION_TOKEN environment variable (recommended) or the OPENAPI_MCP_HEADERS environment variable with your Notion integration token when using either transport mode.
Serving multiple integrations (per-request token passthrough)
By default the server authenticates to Notion with a single token baked in at
startup, which locks one deployment to one Notion integration. To let a single
deployment serve multiple integrations, enable token passthrough so each
client supplies its own Notion integration token per connection:Enable per-request Notion tokens (flag or ENABLE_TOKEN_PASSTHROUGH=true)
npx @notionhq/notion-mcp-server --transport http --enable-token-passthrough
Clients then send their Notion token on the initialize request using the
dedicated Notion-Token header:curl -H "Authorization: Bearer " \ -H "Notion-Token: ntn_****" \ -H "Content-Type: application/json" \ -d '{"jsonrpc": "2.0", "method": "initialize", "params": {}, "id": 1}' \ http://localhost:3000/mcp
How the token is resolved for each connection, in order:
- The Notion-Token header (preferred — unambiguous, and works alongside the
server's own Authorization gateway auth). If present it must be a valid
Notion token, otherwise the request is rejected with 401. - Authorization: Bearer ntn_**** — only when the server's own bearer auth is
turned off (--unsafe-disable-auth), so the header is free to carry the
Notion token directly. - Otherwise the startup env token (NOTION_TOKEN / OPENAPI_MCP_HEADERS), if
set, so passthrough and a default integration can coexist on one deployment.
Notes:
- Only values with a Notion token prefix (ntn_, legacy secret_) are treated
as Notion tokens, so the server's gateway secret and a tenant's Notion token
never collide. - Each token is bound to its MCP session; tokens are never logged (only a
redacted prefix is emitted). - This is a deliberate token-passthrough setup. Always deploy it over TLS, and
prefer keeping the server's own bearer auth (--auth-token) enabled as a
gateway in front of multi-tenant traffic.
Examples
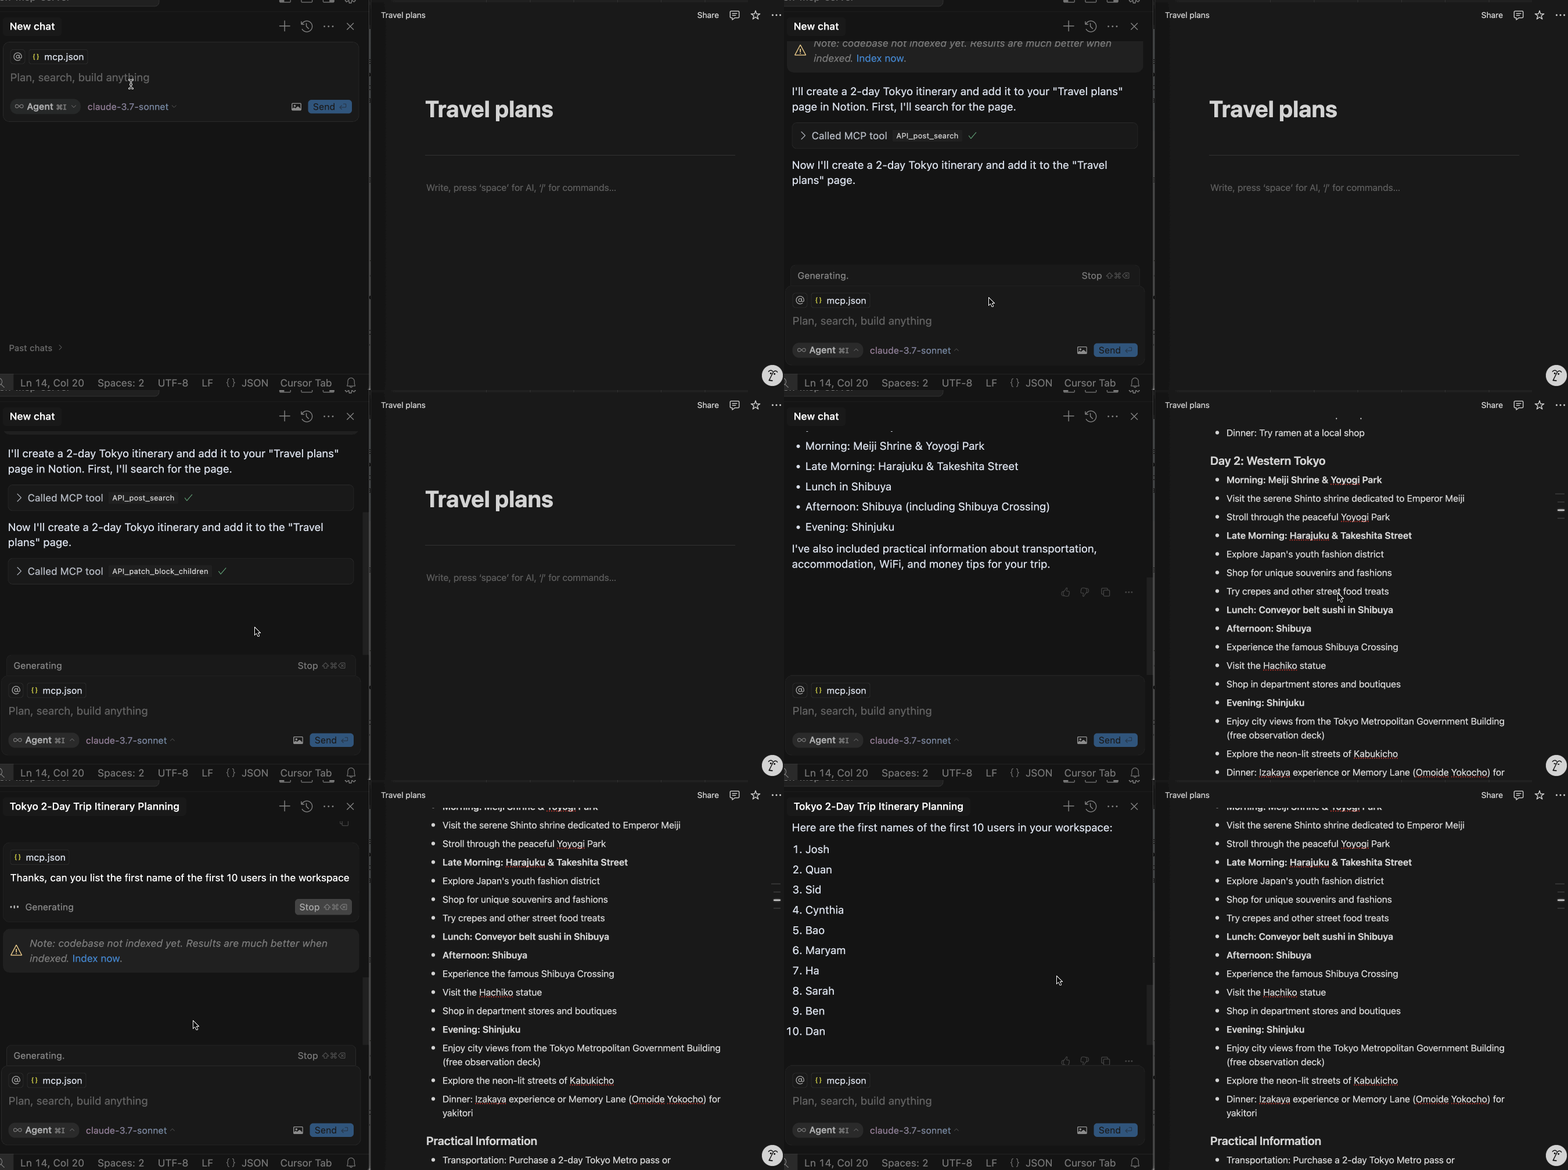
- Using the following instruction
AI will correctly plan two API calls, v1/search and v1/comments, to achieve the task
- Similarly, the following instruction will result in a new page named "Notion MCP" added to parent page "Development"
- You may also reference content ID directly